Summary
The BBGW was announced in May 2016. It is very similar to the previous BBG. The three big differences are:
- BBG has 1 USB port, while BBGW has 4 USB ports
- BBG has 1 RJ45 network port, while BBGW has none
- BBG has no wireless capability, while BBGW has both Bluetooth and 802.11 b/g/n
There are capes that provide wireless functionality to the BBG, but those are 3rd-party capes and not part of the "standard" BeagleBone hardware.
I've previously written a HOWTO on setting up BBB and BBG devices, but the BBGW is slightly different due to the lack of a network port. This page describes how I setup my own BBGW devices.
What You'll Need
These instructions make several assumptions. You'll need the following:
- a BBGW device
- a desktop or laptop computer running a modern distribution of Linux
- a Micro USB to USB Type A cable (such as the ones that typically ship with BBGW devices)
- a Micro SD card and the means to write to the card from the Linux desktop/laptop (perhaps with a MicroSD-to-SD adaptor)
- the latest flasher Linux image for BBGW from Robert C. Nelson
Every few months, Robert C. Nelson updates the BB images he makes available, so it is nearly useless to link directly to a specific disk image. Instead:
- The place to start looking is https://rcn-ee.com/rootfs/.
- At the time this document was written, the most recent image is dated 2016-06-09, so I browse to https://rcn-ee.com/rootfs/2016-06-09/flasher/.
- From that directory, I download the Ubuntu flasher image for BeagleBone -- BBB-eMMC-flasher-ubuntu-16.04-console-armhf-2016-06-09-2gb.img.xz -- which is about 200 MiB in size.
Installing
Run the following commands to extract the installation image and write it to the Micro SD card:
2016-Jul-02: Similarly, if using the Debian BBGW images, these are the commands to run:
Note the newer test image requires a 4 GiB Micro SD card, while the older Ubuntu images were 2 GiB in size.
At near 4 MB/s, expect the 3.4 GiB image to take 15 minutes to write.
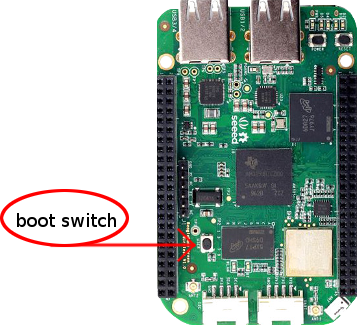
Once the write is complete, eject the Micro SD card and move it to the BBGW. While holding down the boot switch in the bottom left corner, insert the USB cable into the BBGW to power it on. Holding down the boot switch will make it boot from the Micro SD instead of the on-board 4 GiB eMMC.
Once the 4 LEDs in the upper right begin their "sweep" pattern, you can release the boot switch. The BBGW will automatically power down once the installation is finished, at which time you can safely remove the Micro SD.
After you've removed the Micro SD card, press the reset switch, or remove and put back the USB power cable to get the BBGW to boot.
Configuring
The USB cable will be used to establish a ethernet-over-usb network connection between the desktop/laptop and the BBGW. Run the following command:
From the three highlighted lines above (you may need to scroll) we can see the new interface on my desktop computer is called enx88c25580d6e7. To confirm this, run the following command:
Note how that interface doesn't have an IPv4 address. On the BBGW, the default address is 192.168.7.2. On the desktop/laptop, give the new interface the address 192.168.7.1 so they're both on the same network:
You can now confirm that the ethernet-over-usb connection has been setup:
When the flasher image installed itself, it created a default user named "ubuntu" with a password of "temppwd".
2016-Jul-02: If using the Debian image, the default user is named "debian" with a password of "temppwd".
Start a new SSH session to the BBGW by running:
Once logged in, run the typical configuration steps for a new BB system:
Apache2
Apache is setup to listen on port 8080, and provides zero content by default. (See /etc/apache2/ports.conf and /var/www/html/.) If you don't need it running, run:
If it isn't needed at all and you want to remove it, then run:
Setting up WIFI
When running ifconfig, there should be 4 interfaces listed:
- SoftAp0 is the software access point. The default image sets up the BBGW as an access point and uses the ip address 192.168.8.1.
- lo is the usual loopback at 127.0.0.1.
- usb0 is the ethernet-over-usb described above and uses the ip address 192.168.7.2.
- wlan0 is the wireless TI WiLink 8 (WL1835/WG7835-V0) IEEE 802.11b/g/n
Run the following commands:
Assuming you are within range of your WIFI router, that last command should have given you two columns. For example, here is what it looks like for me:
Make note of the service name (wifi_...) you want to connect to, because it will be needed in this next step. In this example, the wifi network to which my BBGW needs to connect is called CCodeRun, so the corresponding service name is wifi_2cf7f1061eae_43436f646552756e_managed_psk.
Create a new file where we'll store some information on the wifi network to which we want to connect:
Paste this content into the new file. Make sure you set the highlighted fields correctly:
Since the file has our wifi password, set the permissions so only root has accesss:
You should now have an address on your local wifi network. Run ifconfig to confirm.
If necessary, you can disconnect from one wifi network and connect to another. For example:
Disabling SoftAp0
The SoftAp0 interface is set to address 192.168.8.1, and a nodejs process listens on port 80. For details, see /usr/bin/wifidog_pre, /etc/wifidog.conf, and /etc/default/wifidog-gateway. Since I use my BBGW as an end device and not a hotspot to which other computers can connect, I want this interface disabled.
The easiest way I found to do this was to edit the script /usr/bin/wifidog_pre:
Add this new line near the top of the script:
Comment out this line at the bottom of the script, and add these 4 new lines below it:
Reboot the device after making these changes.
Installing updates
Now that wifi is up and running, install NTP and download any pending updates:
Building on BBGW
The BBGW only has 512 MiB of RAM. If you try to build anything more complicated than a trivial application, gcc/g++ will run out of memory.
To alleviate this problem, you can setup a swap file:
Add this line to the end of /etc/fstab so the swap file is automatically mounted on reboot:
(Of course, a better solution is to setup cross-compiling for ARM.)
