Summary
I've previously written posts on similar topics:
- Setting up a BeagleBone Black and BeagleBone Green
- Setting up a BeagleBone Green Wireless
- Differences between various BeagleBone devices (including the BBBW)
I've now gotten my hands on one of the new BeagleBone Black Wireless first announced in September 2016, and thought I'd document how I got it up and running with the latest RCN build.
What You'll Need
These instructions make several assumptions. You'll need the following:
- a BBBW device
- a desktop or laptop computer running a modern distribution of Linux
- a Micro USB to USB Type A cable (such as the ones that typically ship with the BBBW devices)
- a 4 GiB or larger micro SD card and the means to write to the card from the Linux desktop/laptop (perhaps with a MicroSD-to-SD adaptor)
- the latest image for BBBW
There are two main sources for the installation images. The "official" builds can be found on the BeagleBoard Lastest Images page. More specifically, you can find a list of images if you browse to https://debian.beagleboard.org/images/. An example of an image for the BBBW is bone-debian-8.6-lxqt-4gb-armhf-2016-11-06-4gb.img.xz.
Another source of installation images are the builds regularly made by RCN (Robert C. Nelson). These are newer than the official released builds, and they're regularly updated so it is nearly useless to link directly to a specific image. Instead:
- The place to start looking is https://rcn-ee.com/rootfs/bb.org/testing/.
- At the time this document was written, the most recent image is dated 2016-12-18, so I browse to https://rcn-ee.com/rootfs/bb.org/testing/2016-12-18/lxqt-4gb/. ("lxqt" stands for lightweight QT desktop environment, a X11 desktop to display on the HDMI interface.)
- Download the build for the BBBW, such as BBBW-blank-debian-8.6-lxqt-4gb-armhf-2016-12-18-4gb.img.xz. The compressed image should be approximately 720 MiB in size.
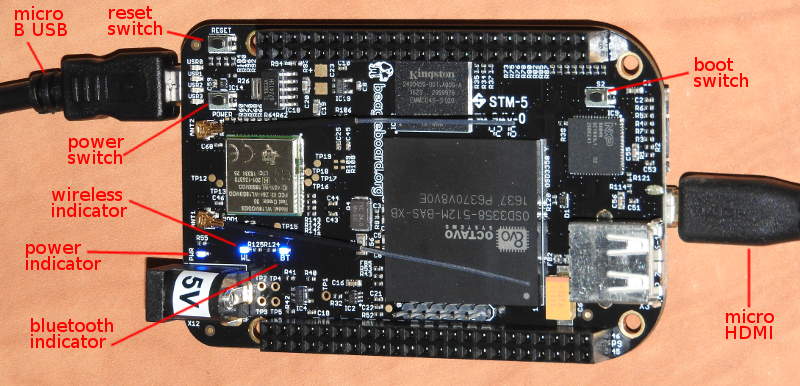
Debug Console
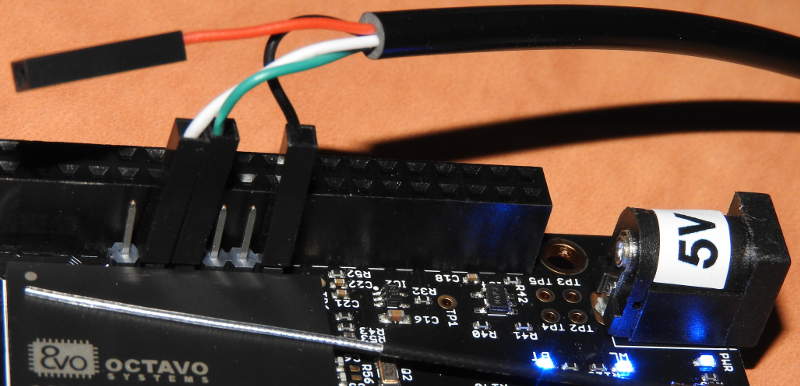
If you have a serial debug cable, now would be a good time to hook it up. This lets you observe any warning or error messages during the installation. All models of BeagleBone use the same serial debug pins:
- Pin #1: ground, black wire
- Pin #2: not connected
- Pin #3: not connected
- Pin #4: receive, green wire
- Pin #5: transmit, white wire
- Pin #6: not connected
The USB/serial debug cable comes with a 4th wire, typically red. Do not connect this 4th wire! It carries +5V from the USB port, while the BeagleBone is only expecting 3.3V on the debug header.
Standard tools such as minicom, screen, or gtkterm can be used to access /dev/ttyUSB0. For example:
Installing
Run the following command to extract the installation image:
The decompressed .img file should be between 3 and 4 GiB in size. Use a tool such as Etcher to write the image to the micro SD card.
Once the write is complete, eject the Micro SD card and move it to the BBBW. On modern builds, you don't need to hold down the boot switch to get the device to boot from the micro SD. Insert the USB cable into the BBBW to power it on. Once the 4 LEDs in the upper right begin their "sweep" pattern, you know the installation is taking place. The entire SD card will be rsync'd to the eMMC. The BBBW will automatically power down once the installation is finished, at which time you can safely remove the micro SD. If you've hooked up a serial console debug cable, look through the messages to see if there was an obvious error during the installation.
After you've removed the micro SD card, press the reset switch, or remove and put back the power cable. This will cause the BBBW to boot from the eMMC with the newly-installed image. If you have a serial console, login with the username "debian" and the password "temppwd". If you are using the ethernet-over-USB, then from the host computer to which the BBBW is connected, run ssh debian@192.168.7.2.
WiFi
Most likely the first thing you'll want to configure is support for WiFi. This can be scripted, but the easiest method is to use Connection Manager in interactive mode:
The WiFi service name is composed of the 12-character MAC address hex string, followed by the SSID name in hex format. This is why it is easier to press TAB to let connmanctl fill in the name to use.
Once you quit from connmanctl, the wlan0 interface should have DHCP'd an IP address. You can now ssh directly to the BBBW device over WiFi.
By default, the BBBW (and BBGW) WiFi uses the "extreme low power" setting. There are three possible settings:
- 0: active mode
- 1: low power
- 2: extreme low power
I've had problems in the past with spotty WiFi connectivity when using the default "extreme low power" setting, so I typically set all my BBGW and BBBW devices to "active mode":
Updates
Now that WiFi is operational, the next thing to do is install any updates and fixes. Run the following commands:
Depending on how recent the installed build happens to be and what exactly was updated, it probably is a good idea to reboot once at this stage.
Timezone
The BBBW uses UTC by default. There are several ways to set a different timezone if you'd like to use something other than UTC.
If you don't know the exact name of the timezone you want to use, then run this command which will let you choose a timezone from a menu:
If you do know the exact name of the timezone -- or you want to script it -- then run this command:
The BeagleBone devices don't have a RTC (real time clock). When powered down, it has no way to keep track of the current date or time. If you want the device to use NTP to get the current date and time, run the following command:
Users
The root and debian users should be secured, and a backup user (other than "debian") probably needs to be created.
Run the following commands to secure the root and debian users:
To create a new username so you don't have to use "debian", run the following commands:
Now that the default credentials are no longer debian/temppwd, you'll most likely want to alter the text shown at the login prompt:
Disk Usage
At this point with a newly-installed device, free space is probably critically low on the eMMC. Run the following:
The root filesystem on /dev/mmcblk1p1 probably has very few MiB available. To clear up some space, purge packages which you are not using. For example, I remove the following:
To get some insight into which additional packages take up the most space on the eMMC, run the following command:
Once packages have been purged, run the following commands to remove old dependencies and delete the purged packages from the local cache:
