This is post #2 of a 5-part series on Darknet. If you've not yet read the summary, I suggest you start there.
Summary
Training a neural network requires many images. Hundreds at a minimum, and thousands if possible. And not thousands of images of different things, but thousands of different images of the same thing. Repetition is how a neural network is trained.
This post is about the tool I wrote to create thousands of synthetic images which I then use to train a neural network. Download the source code to follow along (CC0, public domain license).
Images
In my case, the stone barcode product I want to detect didn't exist, so I couldn't get thousands of images. I had to create some synthetic images to bootstrap the process. The good news is when you're creating synthetic images, you can create as many as you want very quickly. What I needed was:
- A library to generate barcode images. I chose Zint. See my previous post about how to use Zint's C API to generate barcodes.
- Some background images of stones of various sizes and colours. This is where Google Images helps.
Background images
The background images I found were then cropped or resized to 1024x1024, and I saved them as JPEG files (quality=65 in GIMP). I've done this with as few as 4 images to do some quick tests, but in the case of this tutorial it was very easy to find pictures of stones, and I have a total of 42 background images. They look like this:

The synthetic image tool randomly rotates the background images 90, 180, and 270 degrees, so the 42 background images becomes 168 possible background images. On top of which, a small percentage of the time the tool selects a semi-random light colour as the background, meaning even more selection. This is the relevant function in the tool that returns the background image to be used:
Barcode (foreground) images
The barcode image is straightforward, and I've already covered Zint in this previous post. See the functions generate_random_barcode() and convert_barcode_image_to_opencv_mat() in the source code for details.
Labels (Darknet style)
When the background images and the Zint barcode images are combined into a full image, we need to record in a text file the coordinates where the region-of-interest ("barcode") is located. This is used by Darknet to direct the training of the neural net. In Darknet, this is called a "label". The labels have the following format:
- The index/class of the item to be found.
- The X coordinate of the centre of the barcode.
- The Y coordinate of the centre of the barcode.
- The width of the barcode.
- The height of the barcode.
When training a neural net to recognize objects, each object type is assigned a "class ID" starting at zero. In this tutorial, we only recognize a single thing: barcodes. So all of our objects will use class 0 (zero).
The coordinates and size of the region-of-interest are normalized, meaning you don't give the pixel coordinates but instead a float between 0 and 1 representing the total width or total height of the image. An example will help:
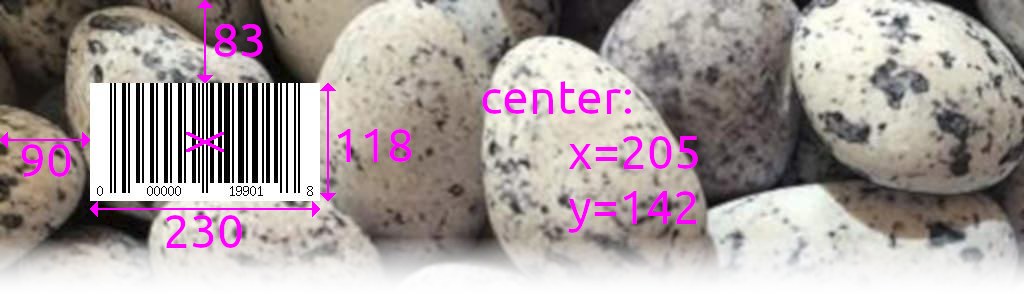
Now that we know the centre of the barcode is at (205,142) and that our image is exactly (1024x1024), we can do the following calculations:
- X = 205/1024 = 0.200195
- Y = 142/1024 = 0.138672
- W = 230/1024 = 0.224609
- H = 118/1024 = 0.115234
The Darknet-style label starts with the class index, which in our case is zero. All fields are separated with a single space. The filename must be the same as the corresponding image, but with a .txt extension, and the content for this example would look like this:
Creating the training images
At this point, you run the tool to create the synthetic images and Darknet labels. Generate at least 1000. The loop is in main():
Once it has finished running, you should have lots of .jpg and .txt files which we'll feed to Darknet for training.

The combined background and barcodes images should look similar to this:

Now that we have thousands of synthetic images we can use, go to post #3 of the series to install and build Darknet.
