See the Youtube video where I go through this tutorial, including how to install the necessary software and setup the project in DarkMark.
Note this tutorial is from 2020, and some information is out of date! For example, the repo and the build steps are no longer accurate. See the Darknet/YOLO FAQ for more up-to-date information.
Summary
Getting started with any of the artificial neural network frameworks is somewhat intimidating.
I've written several posts in the past related to Darknet, DarkHelp, and/or DarkMark. But those posts weren't quite a real beginner's guide.
In this post, I'll assume you know nothing of Darknet or the related tools, and try to keep things both simple and straighforward as we create a sample project to train a neural network to recognize a simple object within an image.
What You'll Need
This post makes several assumptions. You'll need the following:
- A Linux computer or VM running Ubuntu 18.04 desktop (not server). As I write this post, Ubuntu 20.04 is still two months away, which is why I'm still using Ubuntu 18.04 as my most recent development environment.
- Update: I've tried it, and these instructions are exactly the same with Ubuntu 20.04.
- A Linux computer -- not a VM! -- with a decent GPU supported by a recent release of NVIDIA's CUDA SDK.
- The username is exactly the same on both computers.
- The paths to darknet, the home directory, and the neural network directories is exactly the same on both computers.
Darknet also builds and runs on Windows, but I've not used it that way. If you are attempting to use Darknet on Windows or Mac, then this post probably isn't for you.
GPU
When I got started with neural networks, I was renting an AWS EC2 instance at Amazon. The instances with GPUs aren't cheap. When I ran the numbers, I determined that buying my own high-end NVIDIA GPU would be the same price as renting an EC2 instance for 1 month.
I had an older computer from about 7 years ago sitting in my office, so I replaced the video card, and installed Ubuntu Server 18.04 on it. If you do like I did and install a high-end GPU into an older computer, remember to check the rating on the power supply, as a new GPU with an older underpowered power supply will result in brownouts and shutdowns as soon as you start training. Quick trip to the store, installed the new power supply, and the problem was instantly fixed.
The GPU you purchase and install for training your neural network must have CUDA support. You can check at NVIDIA to see what they support. The one I picked up was NVIDIA's RTX 2070, and I definitely don't regret it.
Images
We'll need some images to build the network. The images must be what you want to detect. Don't bother with synthetic images -- unless you are have lots of experience you'll be wasting your time. And if you are doing an industrial product where a camera on an assembly line is taking pictures of a product, don't take a series of pictures to train then move your camera and/or lighting when it comes time to deploy the solution! The network will learn from what you feed it. If you give it a bunch of 1024x768 close up images of screws to train, but then your actual setup consists of tiny 320x200 images from a different angle and with different lights, don't be surprised if things don't work.
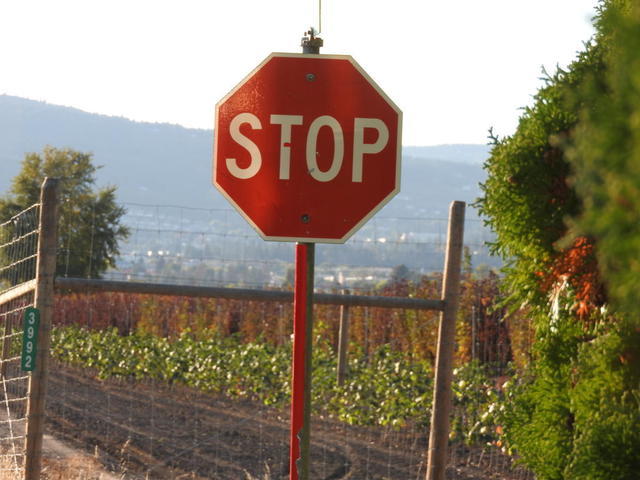
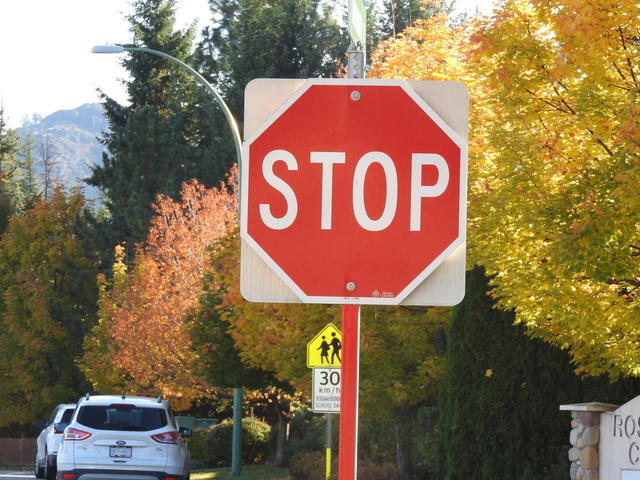
For this example, I have a set of 38 images of stop signs. They look like this:
 |
 |
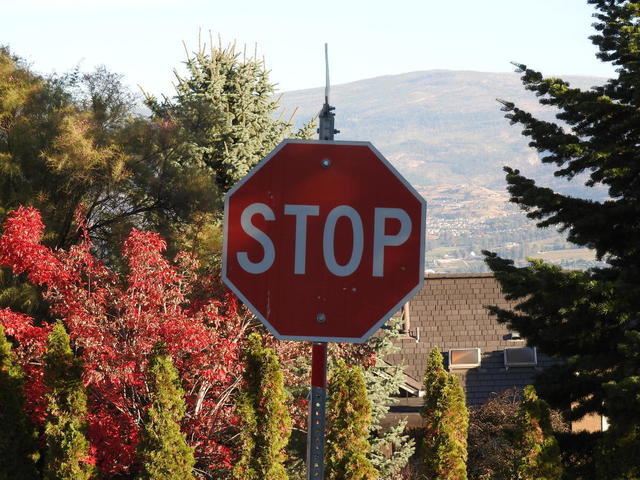 |
The full set of 38 stop sign images is available for download here. Note that 38 images is not nearly enough to train a proper network, but these will get us started with our simple example.
Software
Next, we're going to setup the software we need. There are 3 components: Darknet, DarkHelp, and DarkMark. I've written several posts on these in the past. Here is what you'll need to do:
| Software | What Is It? | Where To Get It? | How To Install? | Links To Posts |
|---|---|---|---|---|
| Darknet and YOLO | This is the software that trains the network and which does image inference. You'll need darknet on both the computer where you are doing the markup as well as the GPU rig where you'll be training the neural network. |
https://github.com/AlexeyAB/darknet |
cd ~ sudo apt-get install build-essential git cmake libopencv-dev git clone https://github.com/AlexeyAB/darknet.git cd darknet # edit Makefile and at a minimum set OPENCV=1, OPENMP=1, and LIBSO=1 make sudo cp libdarknet.so /usr/local/lib/ sudo cp include/darknet.h /usr/local/include/ sudo ldconfig |
Installing and Building Darknet |
| DarkHelp | This is a C++ class wrapper library for Darknet. With it, you can then use the Darknet API and the neural networks you've trained from within C++ applications. | https://www.ccoderun.ca/darkhelp/api/Summary.html https://www.ccoderun.ca/download/ |
Download and install the pre-built .deb file or build from source: sudo apt-get install libmagic-dev libtclap-dev cd ~/src/DarkHelp mkdir build cd build cmake -DCMAKE_BUILD_TYPE=Release .. make make package |
Accessing Darknet in C and C++ |
| DarkMark | This is a GUI tool used to mark up images prior to training the network. | https://www.ccoderun.ca/darkmark/Summary.html https://www.ccoderun.ca/download/ |
Download and install the pre-built .deb file or build from source: sudo apt-get install libx11-dev libfreetype6-dev libxrandr-dev sudo apt-get install libxinerama-dev libxcursor-dev libmagic-dev cd ~/src/DarkMark mkdir build cd build cmake -DCMAKE_BUILD_TYPE=Release .. make make package |
Image Markup |
Creating the project
Configuring darknet by hand can be complicated and error prone. There are several configuration files to deal with. Lucky for us, DarkMark takes care of that for us. The only configuration file we need to manually create is the one in which we'll list all the classes we want to recognize. This is called the .names file. Each line in the .names file must contain the plain ASCII name of a single class. (That's right, darknet uses char* text strings and is not UTF-8 aware.)
For example, if you are training a network to recognize cars, trucks, and motorcycles, your myproject.names file might look like this:
Note that darknet is quite picky: you cannot have comments nor blank lines in this file. The last line must be the last class, not a blank line!
Since we'll be creating a neural network to recognize stop signs, our .names file should have a single line in it, with the words "stop sign". I also like to put my images in subdirectories (set_01, set_02, etc). Therefore, this is what I would do:
The .names file should match the project directory name. And the top-level "nn" is where I store all my neural networks.
Once you extract the images into set_01, you should have this:
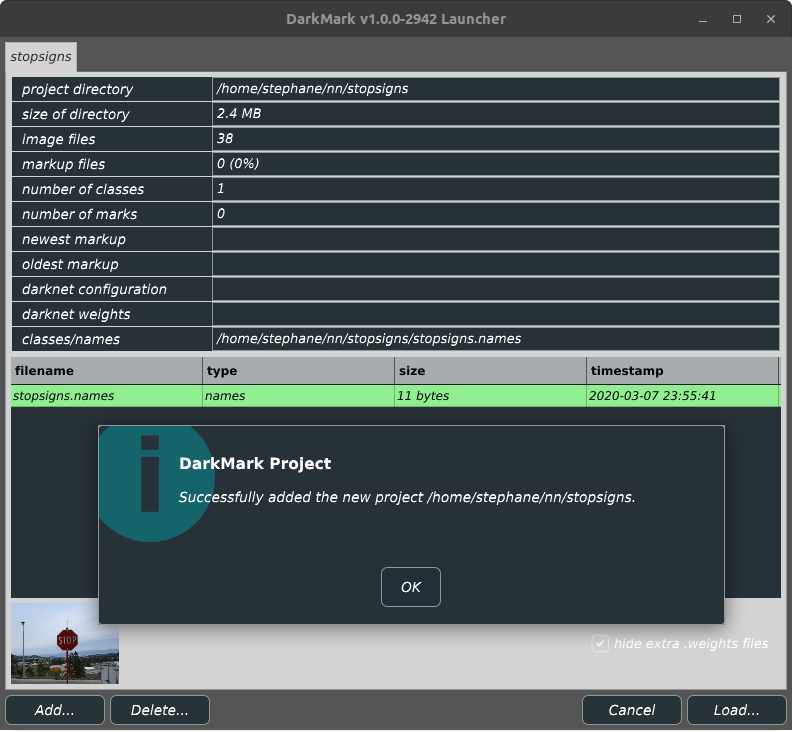
Start DarkMark, click on "Add..." and point it to the stopsigns directory. You should have something similar to this:
Dismiss the confirmation and click on the lower-right "Load..." button. This will launch the markup tool where the window should look like this:
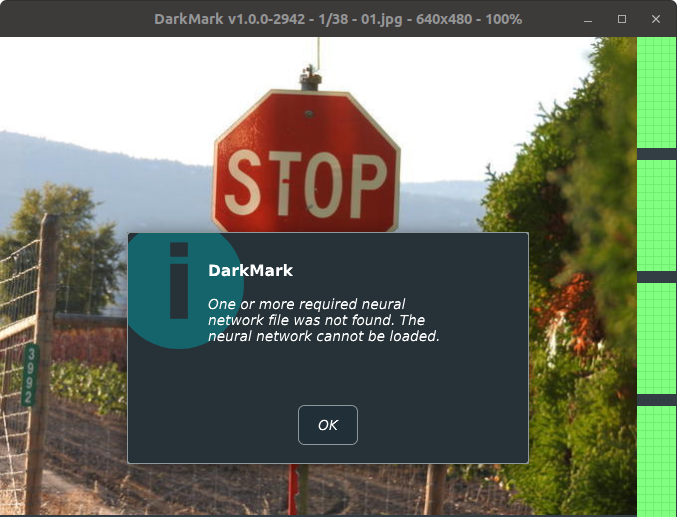
That warning is expected; since we haven't yet trained the neural network for this project, DarkMark cannot find the necessary files to load the neural network.
Now comes the repetitive part of the work. You need to go through the 38 images and mark up the stop signs. Click the mouse in the image and drag to the other corner of the stop sign. The image should look like this:
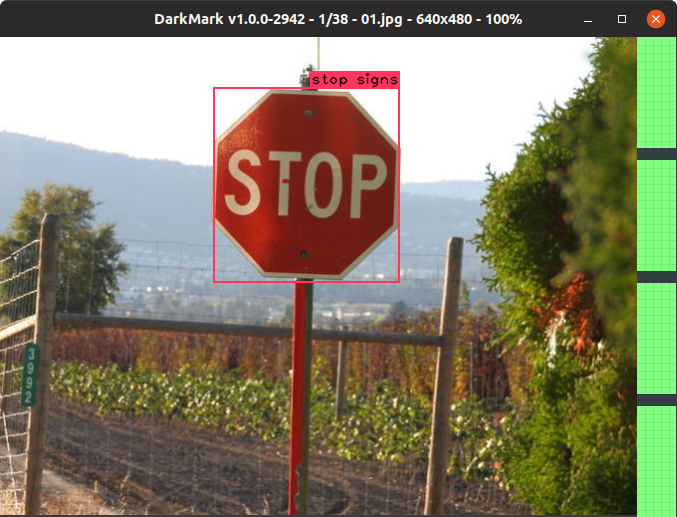
If it doesn't, either try again, or click one of the corners of the red bounding box to drag it until it is close to matching the example image above. Now would also be a good time to tell you that right-mouse-click in the DarkMark window will get you access to a series of popup menus. A summary of the first few keys you probably want to know:
- LEFT arrow key: move to previous image
- RIGHT arrow key: move to next image
- PAGE UP key: move to previous image which is not yet marked up
- PAGE DOWN key: move to next image which is not yet marked up
- DEL key: delete the current markup
- ESC key: quit from DarkMark
There is a page within the DarkMark project that lists all of the shortcut keys.
Also take a peek at the post which describes important information to know when marking up images.
Once you finish marking up the 38 images, right-mouse-click and select "create darknet files...":
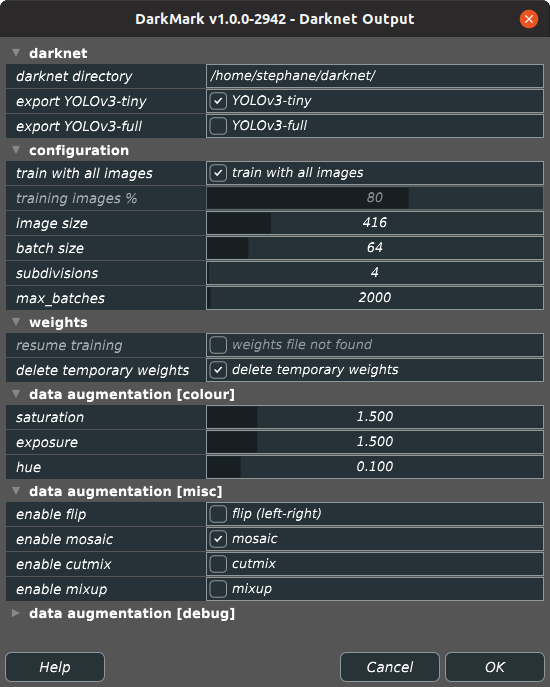
The subdivisions may need to be modified depending on which GPU video card you own and how much memory it has. Otherwise, the rest of the options should probably be set similar to the image above. Click "OK" and DarkMark will then generate all of the necessary configuration files for darknet. Once back to the main DarkMark window, press ESC to quit.
Training the network
The project directory should now have a large number of new files:
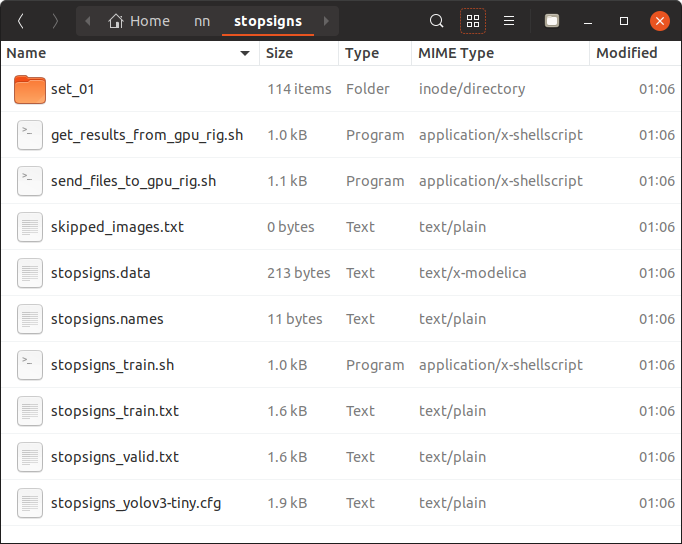
There are two files in particular I'd like to point out:
- send_files_to_gpu_rig.sh
- stopsigns_train.sh
The assumption here is the computer that runs DarkMark is not necessarily the computer with the high-end GPU video card you'll use to train the neural network. So the script "send_files_to_gpu_rig.sh" uses rsync to get everything needed to a rig named "gpurig". (Add an alias for it in your /etc/hosts file.) Or modify the script to make it do what you need.
Once the files are on the rig where you'll train, run "stopsigns_train.sh" to begin training. Then you sit back and relax.
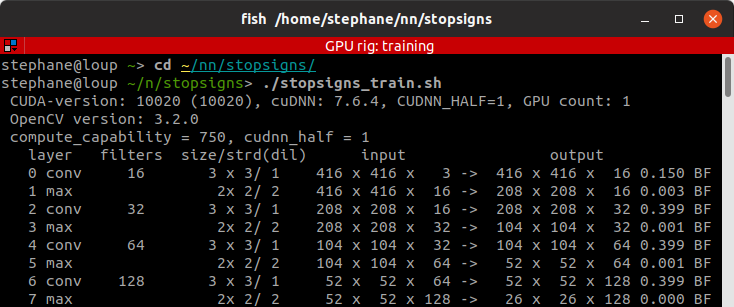
With a decent video card and darknet correctly configured to use GPU+cuDNN, it should take ~15 minutes to get through the 2000 iterations. If you're training with the CPU instead of a GPU, it might take several days.
Viewing the results
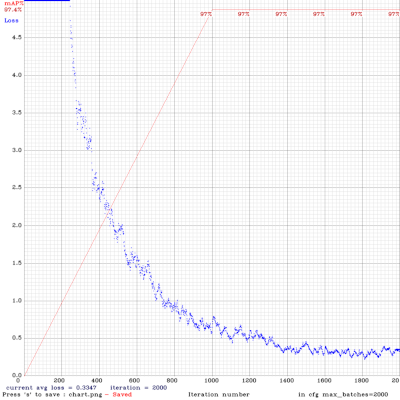
The script "get_results_from_gpu_rig.sh" is similar to "send_files_to_gpu_rig.sh". It uses rsync to get the weight files from the GPU training rig, and then it displays the chart with a summary of the training session. You can run this script multiple times, even when your GPU rig is still in the middle of training the network. Once training has finished, the output chart should look similar to this:
But the real test is to view the neural network in action. You can use darknet for this (darknet detector test ...) or the DarkHelp command-line tool. The neural network is the combination of 3 files:
- the .cfg configuration file
- the .weights network file
- the .names text file
So using the DarkHelp command-line tool, we'll provide all the necessary files, and then list some image files we'd like DarkHelp to use:
DarkHelp has a page that explains the many command-line parameters.
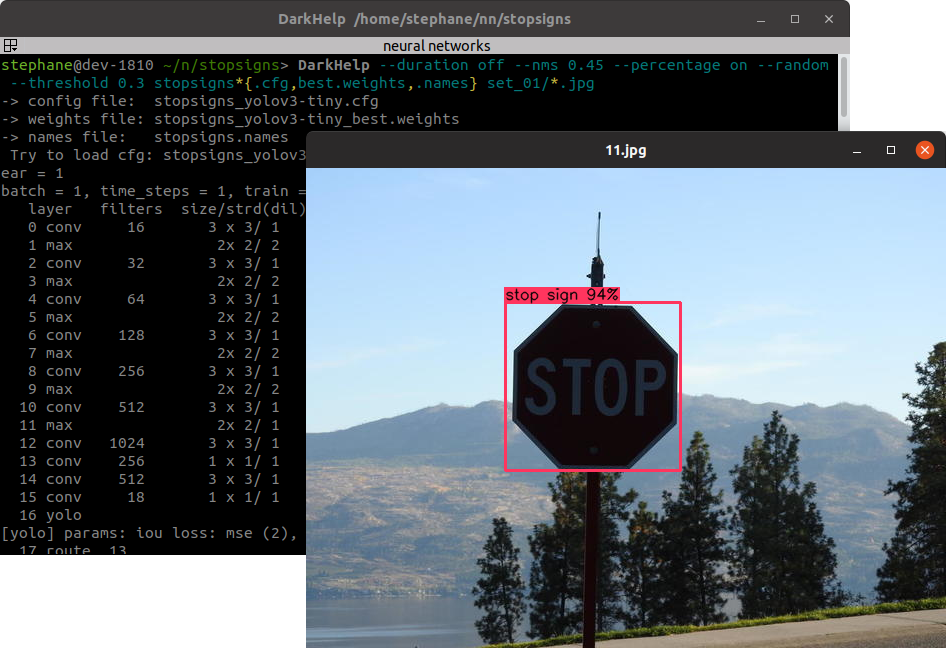
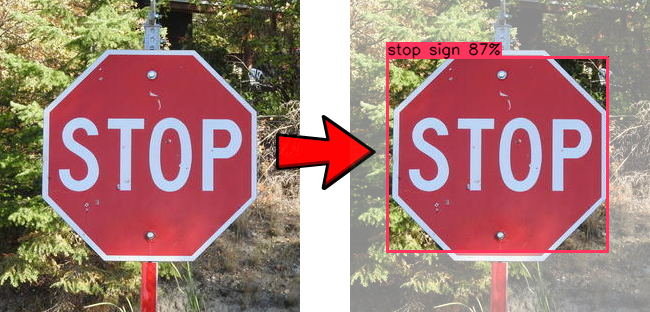
The network does not have anywhere near enough images or diversity, nor was it trained for long enough to be very effective, but even with the minimal 2000 iterations it should be good enough to pick out the stop signs in our images:
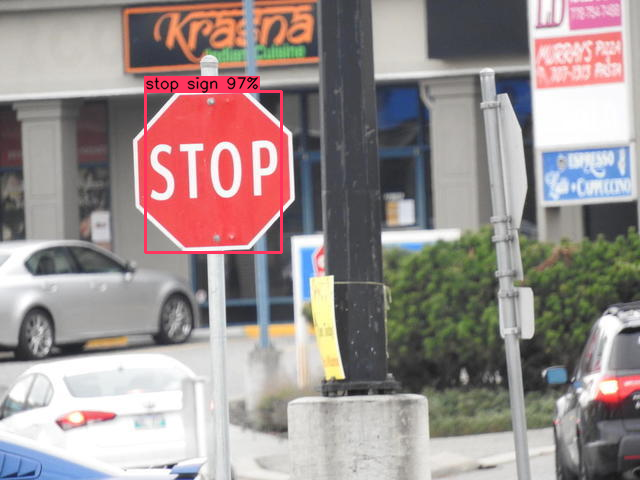 |
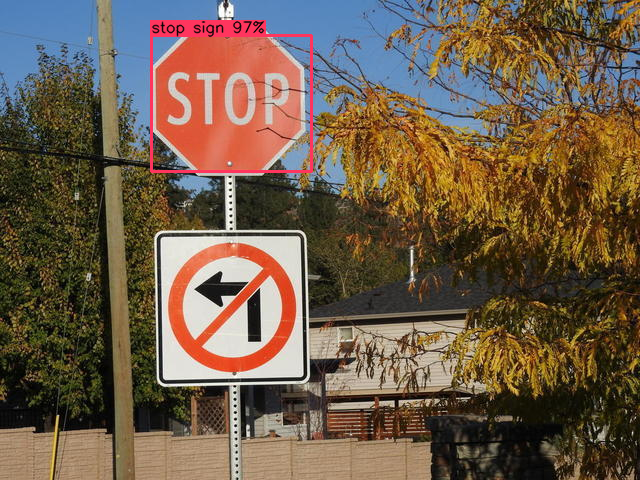 |
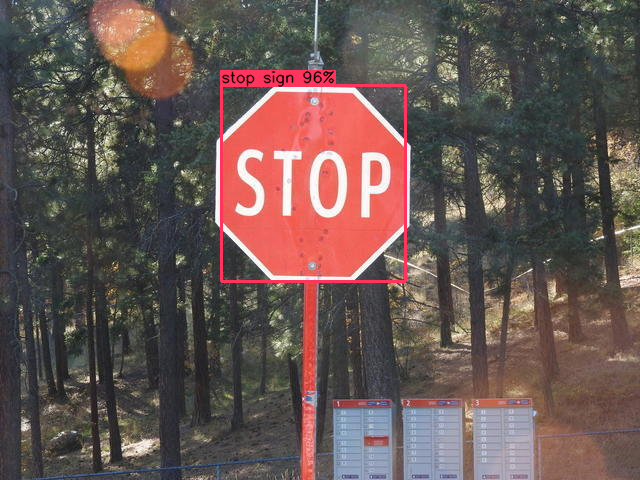 |
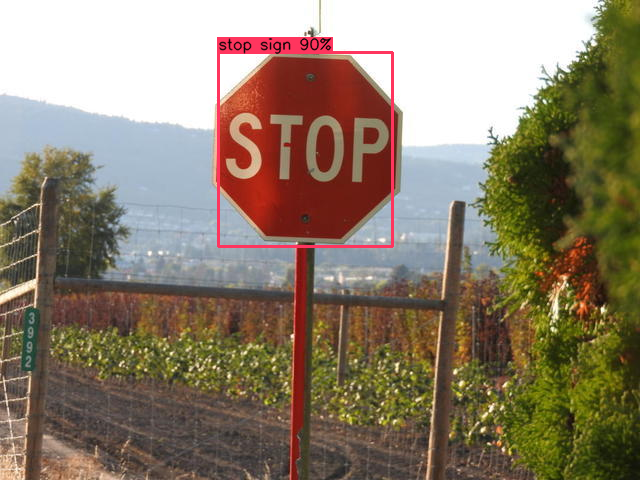 |
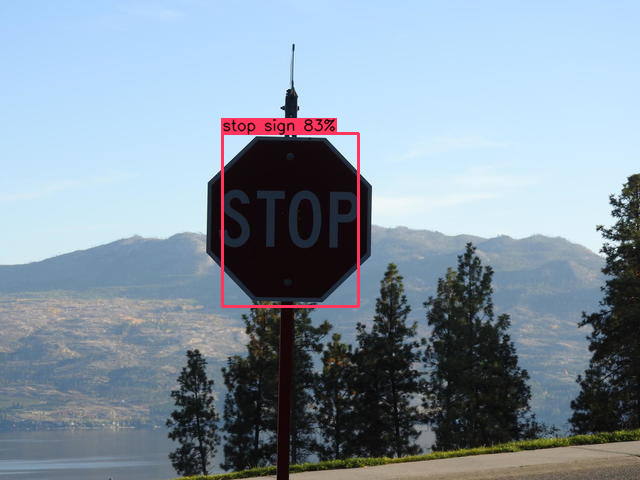 |
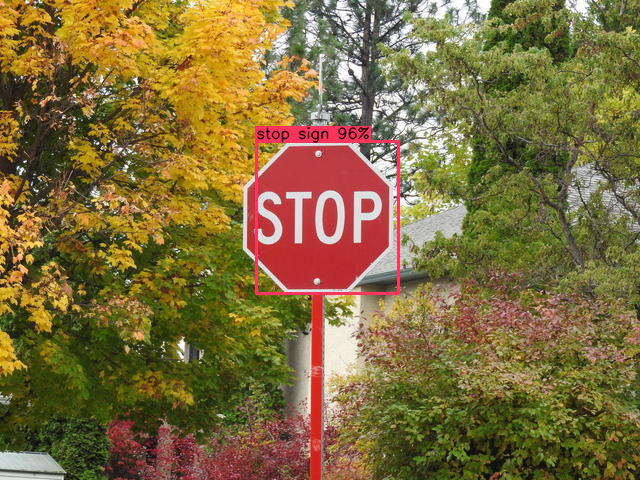 |
That's it! At this point, you have your first neural network. Continue adding more images and train for many more iterations if you want it to get better.
