(Looking for the TLDR troubleshooting list?)
Summary
The Darknet/YOLO Discord and Darknet Issues regularly sees certain questions come up. This page will attempt to answer these frequenty asked questions.
Stéphane's Darknet/YOLO FAQ:
- TLDR troubleshooting
- What is Darknet? What is YOLO?
- What software is used to make this work?
- Which software repos should I use? Which should I avoid?
- How do I get started?
- What datasets can I use to get started?
- Which configuration file should I use?
- Does the network have to be perfectly square?
- How does sizing work?
- What is the optimal network size?
- Can I train a neural network with a CPU?
- What is the difference between CPU and GPU?
- How many images will it take?
- What about negative samples?
- Can I train a neural network using synthetic images?
- What does the error message "CUDA Error: out of memory" mean during training?
- What does the error message "signal handler invoked for signal #4" mean?
- What does the error message "parameter packs not expanded" mean?
- What does the error message "unsupported gpu architecture" mean?
- How to build Darknet on Linux?
- How to build Darknet on Windows?
- What about OpenCV and CUDA?
- How many FPS should I expect to get? How can I increase my FPS?
- How much memory does it take?
- How long does it take to train?
- What command should I use when training my own network?
- How should I setup my files and directories?
- What about the "train" and "valid" files?
- How to run against multiple images?
- Should I crop my training images?
- How to annotate images?
- How do Darknet/YOLO annotations work?
- How do I turn off data augmentation?
- How important is image rotation as a data augmentation technique?
- Support Darknet/YOLO with Merch!
- Where can I get more help?
What is Darknet? What is YOLO?
From a discussion on the Darknet/YOLO Discord on 2020-Nov-12:
And the follow-up question:
In older versions of Darknet, OpenCV was optional. In newer forks of Darknet, OpenCV is now required.
See also: Which repos to use and avoid?
What software is used to make this work?
Darknet
The minimum you'll need to download and build is darknet. Darknet is the framework, which also includes the YOLO configuration files. This software will let you both train new neural networks, and run inference using images & video frames.
- The original version of Darknet was written by Joseph Redmon, but his "pjreddie" repo was abandoned many years ago and should not be used. It hasn't received any updates since ~2016.
- The original repo was then forked by "AlexeyAB" and maintained from late 2016 to 2021. AlexeyAB has moved on to other projects, and no longer maintains this repo.
- The popular "AlexeyAB" repo was forked by Stéphane Charette for Hank.ai in 2023. Please see the fork maintained by Stéphane Charette while working at Hank.ai. The instructions below in this FAQ for building in Windows and building in Linux assumes that this modern version of Darknet/YOLO is used.
"Darknet" can refer to the overall framework, the CLI tool, or the C and C++ library (libdarknet.so in linux or darknet.dll in Windows). The C and C++ library allows people to easily incorporate support for neural networks into their own applications, including other language bindings such as Python.
Versions of Darknet/YOLO are:
- V0: The original Joseph Redmon version, which at the time did not have a version number assigned to it.
- V1: The fork by AlexeyAB, which at the time also did not have a version number assigned to it.
- V2 "Oak": The fork by Stéphane Charette in 2023. Some of the changes are sponsored by Hank.ai. When you run "darknet --version" this will return the exact V2 version string.
- V3 "Jazz": The fork by Stéphane Charette in 2024 with all the recent performance-related changes. Same repo as V2, and sponsored by Hank.ai. When you run "darknet --version" this will return the exact V3 version string.
- V4 "Slate": The fork by Stéphane Charette in early 2025 with support for AMD GPUs. Similar to V3, but with the latest changes sponsored by Koshee.
- V5 "Moonlit": Released in late August 2025. Contains more performance optimizations, including support for OpenBLAS which is particularly useful on non-GPU devices. Also includes a new ONNX export tool to convert Darknet/YOLO configuration and weights to the popular ONNX format. Repo moved to https://codeberg.org/CCodeRun/darknet#table-of-contents and automatically mirrored to GitHub.
- V6 "Winston": Development branch. Currently scheduled for release in 2026.
OpenCV
OpenCV is an open-source library that provides image manipulation functionality. It is a very popular library, and common to many modern projects that work with images. The library is quite complex, has many optional sub-requirements, and many different tutorials exist to do custom/manual builds. Unfortunately, many of these tutorials are for projects other than Darknet, and make incorrect assumptions about what modules from OpenCV are needed. This is why it is recommended to follow the instructions from this FAQ.
Older versions of Darknet didn't require OpenCV. As of 2023, the newer versions of Darknet (starting with Darknet V2 "Oak") require OpenCV.
CUDA
CUDA is an optional closed-source library from NVIDIA. It only makes sense to use CUDA if you have a NVIDIA-brand GPU in your computer. For training, this is more-or-less required. For inference, this is optional, though without a CUDA-supported GPU it means inference will be slower.
CUDNN
CUDNN is an optional closed-source library from NVIDIA. It provides functionality that neural networks can use to speed things up. Similarly to CUDA, this requires a NVIDIA-brand GPU in your computer.
DarkHelp
DarkHelp is an optional open-source C++/C/Python API wrapper and CLI for Darknet. DarkHelp was written by Stéphane Charette -- the author of this FAQ -- to supplement Darknet and provide a robust CLI and commercial-ready API that does more than Darknet itself. DarkHelp provides several advanced features -- such as image tiling, snapping, and DarkHelp Server -- which Darknet does not support natively. DarkHelp is available for Linux, Windows, and Mac.
DarkMark
DarkMark is an optional open-source GUI tool to manage Darknet projects, review annotations, and create Darknet training files. Stéphane Charette provides many YouTube videos showing how to use DarkMark to successfully build a Darknet/YOLO neural network. To use DarkHelp's tiling mode to find small objects, DarkMark is typically required as it has the necessary options to pre-process the training images and annotations for tiling. DarkMark requires Linux, though it does also run in Windows when using WSL2 or in a Linux VM.
See also: Which repos to use and avoid?
Which software repos should I use? Which should I avoid?
Joseph Redmon
Originally, Darknet was written by Joseph Redmon. His web site is still up (as of 2026) and his repo still exists: https://github.com/pjreddie/darknet. The first commit to this repo was on Nov 4, 2013. This is the repo that gave us the original YOLO, YOLOv2 (2016-06), and YOLOv3 (2018-03).
Note that this repo is out of date, and has not been maintained for a number of years. Do not use this old version of Darknet!
Alexey Bochkovskiy
This quickly became the most popular fork of the original Darknet codebase. Also known as the "AlexeyAB" fork, it was most active from late 2016 to July 2021.
This is the repo that gave us YOLOv4 (2020-05) and YOLOv7 (2022-08). Alexey is now working on other projects and no longer maintains this codebase.
Stéphane Charette and Hank.ai
In May 2023, the company Hank.ai announced they would sponsor the continuing development of Darknet/YOLO. At the time, Stéphane Charette was working at Hank.ai. The most recent "AlexeyAB" repo was forked with Alexey's permission, and Stéphane began working on getting Darknet to work better in commercial and non-research scenarios.
Stéphane Charette (aka "C Code Run")
In 2024 and 2025, Stéphane's role at Hank.ai was reduced and eventually eliminated. The first version of Darknet released on C Code Run's Codeberg repo instead of Hank.ai's GitHub repo was v5.0 in August 2025. This is the repo which is currently recommended for use: https://codeberg.org/CCodeRun/darknet.
Note the Hank.ai GitHub repo mirrors the CCodeRun repo on Codeberg. All changes made to the CCodeRun Codeberg repo are mirrored immediately on GitHub. Even the SHA-1 git hash codes should be exactly the same between both repos.
The former web site domain name www.darknetcv.ai belongs to Hank.ai, so Stéphane moved the documentation to www.ccoderun.ca/darknet/.
In addition to working on the current fork, Stéphane Charette has two other Darknet-related repos that may be of interest to Darknet/YOLO users:
- DarkMark, the Darknet project manager and annotation tool: https://codeberg.org/CCodeRun/DarkMark#what-is-darkmark
- DarkHelp, the CLI and C++/C/Python API wrapper for Darknet with advanced features such as tiling and snapping: https://codeberg.org/CCodeRun/DarkHelp#what-is-the-darkhelp-c-api
Others
In recent years, several other companies have used the YOLO name and re-implemented parts of Darknet in Python, often incrementing the YOLO version number making it appear as if they are newer or better than Darknet/YOLO. Some of the more popular companies that have done this are not free, and/or may require that you pay them a monthly or yearly license fee to use your neural network. These other versions of YOLO are not related to the free and open-source Darknet/YOLO project, and the results are both slower and not as precise as what you'll get from the free Darknet/YOLO repo.
How to get started with Darknet? How long will it take?
The first thing to mention to users wanting to get started: join the Darknet/YOLO Discord server! This is the best place to ask for help.
Once you get Darknet and related tools installed (see the build instructions for either Linux or Windows), the next step is to annotate some images and train your first neural network.
The most recent tutorial is the one from December 2023 to find defects in pieces of leather:
As shown in the video, getting the annotations done and training the network for the first time can be accomplished in less than 30 minutes.
In the past, there were 2 other tutorials linked from the Darknet/YOLO FAQ, one for "fire" (February 2021) and the other for "stop signs" (August 2020). Be careful if you view those older tutorials since many of the steps have since changed.
See also: What datasets can I use to get started?, How many images will it take? and How long does it take to train?
What datasets can I use to get started?
The first dataset people often use to check that things are working is the 80-class MSCOCO dataset. Also known as "the pre-trained weights." You can find a link to it from the Darknet/YOLO repo.
While MSCOCO is an interesting network to run, the full image dataset that is used to create MSCOCO is over 100 GiB in size, making it too big for most people to download and train. It also contains many classes that are unlikely to be used by most people, and the annotations are not in YOLO format which complicates things.
So instead, here is a short list of small sample datasets that we use for demos and tests. These can be particularly useful for people who are getting started, or who want to see what YOLO annotations look like.
The "LEGO Gears" dataset. Contains images, YOLO annotations, and fully trained Darknet/YOLO .weights file. This is the one that Stéphane recommends people download and play with. |
|
The "People-R-People" pre-trained weights. Find people in images, both single people or large crowds. |
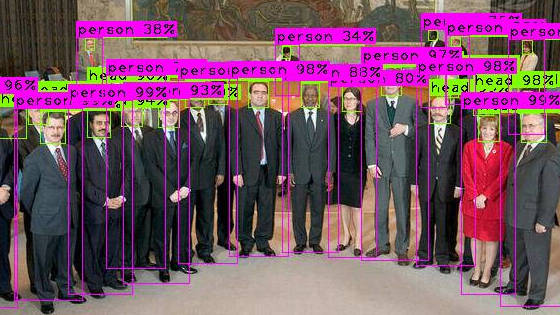
|
The "Rolodex" dataset. Contains images, YOLO annotations, and fully trained Darknet/YOLO .weights file. |
|
The "Granada" dataset. Contains images only, no annotations, no network file, no .weights file. |
|
The MVTec anomaly detection dataset. The "leather" portion of that dataset was used to create the Linux installation tutorial. (They've since made it harder to find and download, but the dataset is CC BY-NC-SA 4.0 and can be downloaded directly from here.) |
See also: How to get started? and How many images will it take?.
Which configuration file should I use?
Darknet comes with many configuration files. This is how you select which configuration file to use:
Most people should be using YOLOv?-tiny. For example, this includes:
- YOLOv3-tiny (v3 is slightly faster than v4)
- YOLOv4-tiny (v4 has the best quality output, but is slightly slower than v3)
- YOLOv7-tiny (v7 is both slower and lower quality output than v3 and v4)
The "tiny" in the name refers to the fact that this configuration has 2 YOLO layers instead of 3, not to the size of the objects.
Especially if you are just getting started building a new neural network, or you're looking to get fast yet accurate results, this is the correct network configuration file to use.
Almost 100% of the videos posted to Stéphane Charette's YouTube channel are done using YOLOv4-tiny.
As of 2026, Stéphane still recommends YOLOv4-tiny over YOLOv7-tiny or other Python-based YOLO frameworks like YOLOv9 & YOLOv10. See the video below to see why.
- If you have many classes, and the neural network is blending some nearby objects together, then try yolov4-tiny-3l.cfg. The "3L" in the name refers to the 3 YOLO layers. This network config is slightly bigger and slower than YOLOv4-tiny.
- Lastly, the largest and slowest configuration is the full yolov4.cfg and yolov7.cfg. It is unlikely that your custom neural network needs to use these configuration files.
Videos to watch:
See also: Configuration Files and How many FPS should I expect to get?
Does the network have to be perfectly square?
No.
The default network sizes in the common template configuration files is defined as 416x416 or 608x608, but those are only examples!
Choose a size that works for you and your images. The only restrictions are:
- the width has to be evenly divisible by 32
- the height has to be evenly divisible by 32
- you must have enough video memory to train a network of that size
Whatever size you choose, Darknet will stretch (without preserving the aspect ratio!) your images to be exactly that size prior to processing the image. This includes both training and inference. So use a size that makes sense for you and the images you need to process, but remember that there are important speed and memory limitations:
- As the size increases, the training and inference will slow down, and more GPU memory will be required.
- As the size decreases, the training and inference will speed up, but the harder it becomes to find small objects during inference.
See also: How does sizing work, What is the optimal network size, and How much memory does it take?
How does sizing work?
This is somewhat already discussed on the DarkHelp and DarkMark pages. But here is a simple example to visually understand what is happening.
There are 3 related sizes that must be considered:
- the image dimensions
- the network dimensions
- the size of each object within the images
Of these 3 sizes, Darknet/YOLO only knows about one: the network dimensions. For example, the default network dimensions (which can be changed!) when using YOLOv4-tiny.cfg is 416x416.
This means that prior to looking at any video frame or image, Darknet will resize the image to match the exact network dimensions in the .cfg file. Darknet/YOLO will never see the original full-size image.
Please re-read the previous paragraph, it is extremely important to understand! It means you can give Darknet/YOLO an image that measures 999999x999999, or an image that measure 500x500, and it will make zero difference. In both cases the images are guaranteed to always be resized to 416x416 prior to Darknet/YOLO examining them.
Now that we know what Darknet/YOLO does with the images, we need to understand how this impacts the results:
- When you increase the network dimensions, you can more easily find smaller objects.
- As you increase the network dimensions, you also increase the time it will take inference to complete.
- Larger networks require much more memory to train, and slightly more memory to run.
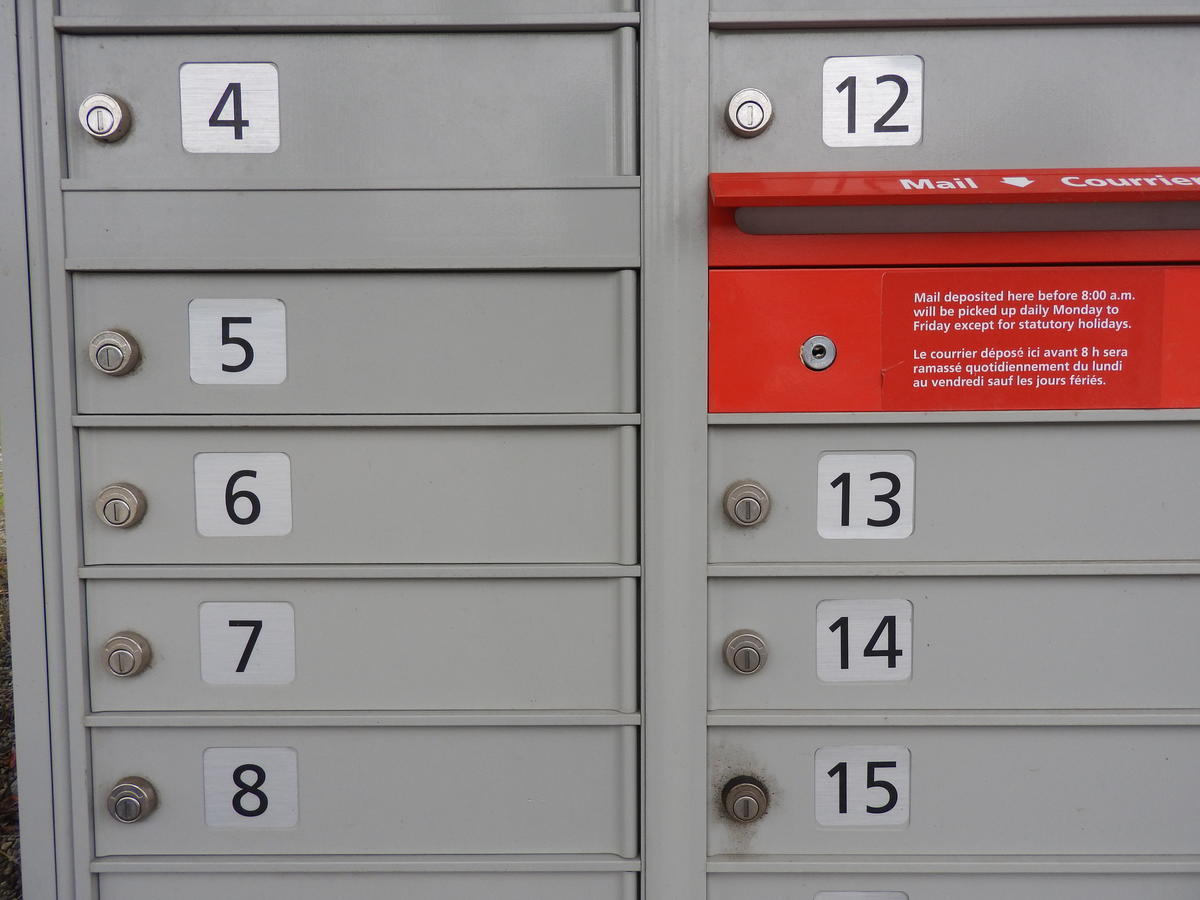
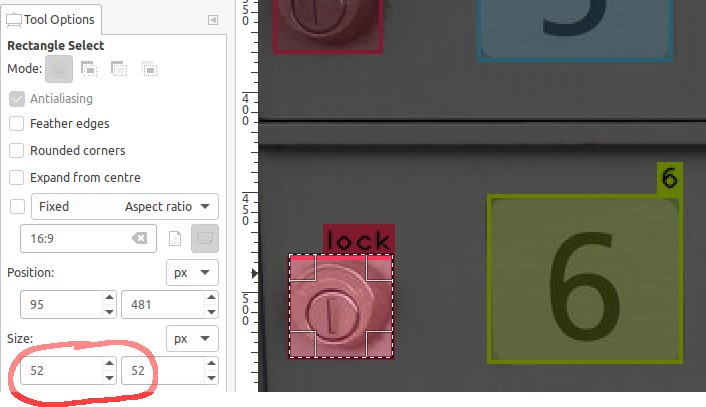
Let's jump to an example. Now that we know that all video frames and images will be resized to the network dimensions, it is important to understand what impact that has on the objects within the images. This image of some mailboxes originally measures 1200x900 (click to see the full-sized image):
Here is the same image, but with the training annotations shown:
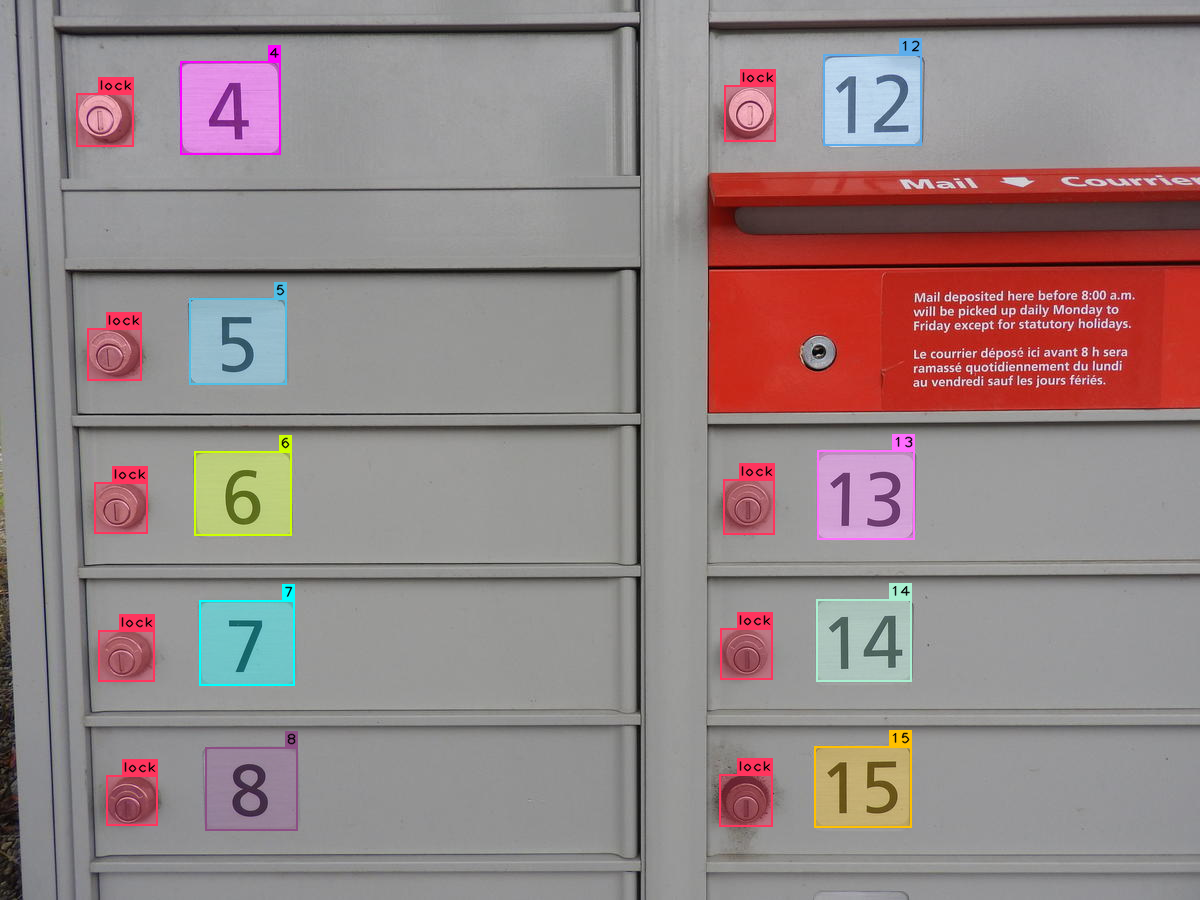
Remember that Darknet/YOLO only cares about the network dimensions! So assuming we have a network that measures 416x416, here is the same annotated image as above, but resized to match the network dimensions:
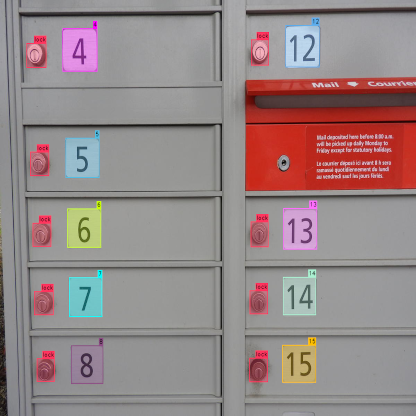
The locks which previously seemed to be easy to find now measure only 19x24 pixels:
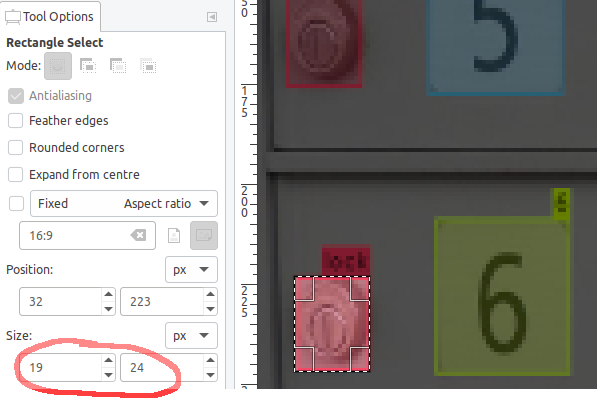
Anything larger than 16x16 pixels shouldn't be a problem for Darknet/YOLO, but as this shows, it doesn't take long before small objects approach that size once the images are scaled down to match the network dimensions.
(If your objects are smaller than 16x16 pixels once your images are resized to match the network dimensions, see this video on YouTube.)
If instead our images were like this one:
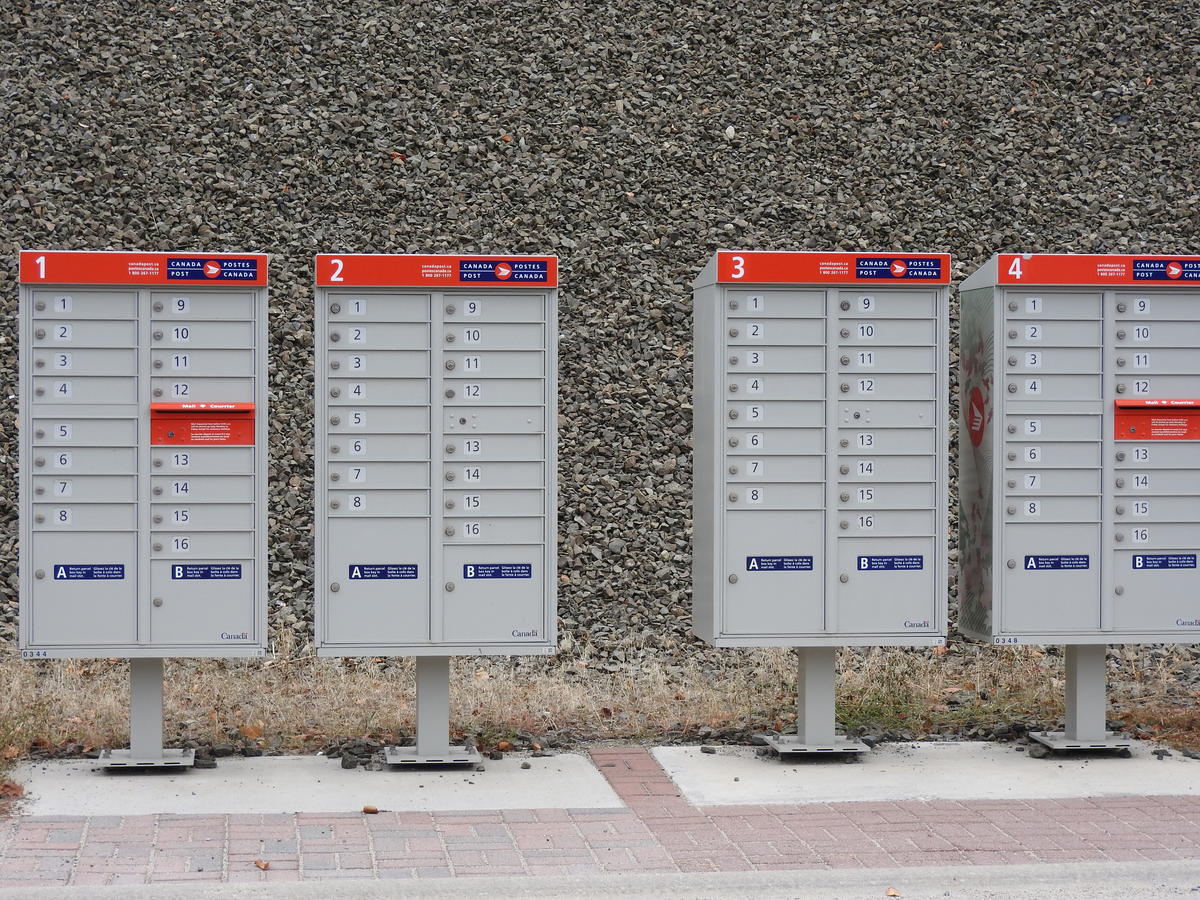
Once the image (with annotations) is resized to match the network dimensions of 416x416, the locks only measure approximately 5x7 pixels. Darknet/YOLO cannot find objects of that size.
If you attempt to train with annotations and images like this with too-small objects, you end up with a network that has a low mAP% and very poor results because during training you're telling Darknet that something exists at this location, but Darknet cannot see it.
See also: Does the network have to be perfectly square and What is the optimal network size.
What is the optimal network size?
As you are reading through the math in this answer, also see this video:
Math can tell you what network dimensions you should be using. Assuming you've already seen the FAQ entries on which configuration file to use, square networks, and that you understand the 3 related sizes, then it should be simple to calculate the best size to use for your network.
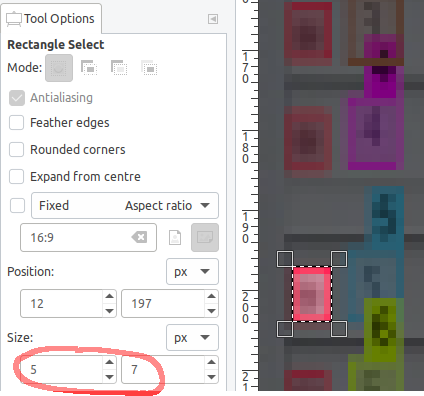
Knowing that Darknet/YOLO works best when the object size is 16x16 pixels or larger, take the smallest object you have in your images, and see what size the image needs to be before this object is approximately 16x16 pixels. Any decent image application like GIMP can help. For example, given mailboxes like the ones in this image (click to see the full-size image):
In GIMP, it is easy to see that the smallest objects in the original 1200x900 images are approximately 52x52 pixels in size:
Since the original image size is 1200x900, this means to get an object size that measures approximately 16x16, the image dimensions can be cut by 3. 52x52 / 3 = 17x17. This would make the locks measure 17x17 pixels in the resized images.
And 1200x900 / 3 = 400x300. However, knowing that the network dimensions must be divisible by 32, the closest values to 400x300 would be 416x288. Indeed, when this image is resized to 416x288, the locks are approximately 18x16 pixels which is perfect for Darknet/YOLO:

When you change the size of the network, you'll also want to recalculate the optimal YOLO anchors. There are tools like DarkMark which automatically does this, or see the Darknet readme file for details.
See also: How many FPS should I expect to get?
Can I train a neural network with a CPU?
No.
While technically you probably could with a very simple neural network and lots of patience, the length of time you'll have to wait does not make sense. Inference of single images with a CPU does work, but training would takes weeks or months instead of minutes or hours with a decent GPU.
If you don't have a NVIDIA GPU with support for CUDA, then training should be done on a free service such as Google Colab. The Darknet/YOLO discord server has a channel specifically to help people use Darknet/YOLO on Google Colab.
See also: How long does it take and CPU vs GPU.
What is the difference between CPU and GPU performance?
The CPU-only version of darknet can be used for inference, but it is not as fast as when a CUDA-compatible GPU is available.
When using the CPU, inference is measured in seconds. When using a GPU, inference is measured in milliseconds.
An example, using YOLOv4-tiny, 640x480, against a directory with 65 JPG images:
- on a 8-core 3.40 GHz CPU, processing all the images took 19.39 seconds
- on a GeForce RTX 2070 GPU, processing all the images took 2.01 seconds
See also: Training with a CPU? and How many FPS should I expect to get?
How many images will it take?
It depends. There isn't a single magic number that answers this question for everyone.
A simple tldr answer: between a dozen and many thousands. The type of network you are building is what will determine whether you need "a few images" or "thousands of images".
A more detailed answer:
- Scenario #1:
Say you are using Darknet/YOLO to find a specific and recurring location in an image, and there is very little variability between images or video frames. The lighting is always the same, the camera is always the same, and the objects detected are always the same.
Examples include:- finding text fields on nearly-identical scanned forms for a business or government agency,
- a camera pointing at some internal machinery to locate a mechanical gear,
- a camera looking at a specific location on a conveyer belt in a factory to detect when a part has reached a specific location.
- Scenario #2:
Then we can imagine a camera pointed to a fixed location, but where the scene changes. Lots of different things may be seen and perhaps identified. The lighting will likely also change, which impacts how an object appears.
Examples include:- a traffic cam mounted to a pole and always looking at the same intersection,
- a security camera in a building or a parking lot, again always looking at the same area,
- screenshots or video feed of a game running on a computer (aimbots, farming, etc).
- Scenario #3:
The last example will be for situations where the images or video feed is uncontrolled, or with high variability. There is no control over the size of the image, the zoom level, the angle, or the quality of the image. Both the camera and the scene likely have a high amount of variability.
Examples include:- a camera drone flying outside, where images might alternate between very close up and very far away, many different ways to tilt the camera, and different levels of lighting,
- a camera attached to a robot or a vehicle (dashcam, helmetcam),
- images or videos that people take on a cell phone or other portable device and then submit for object detection.
In all cases, you can start with just a few images. In the old stop sign tutorial a neural network is trained to find stop signs with 30+ images. And you can do it with less; Stéphane has several videos on YouTube showing how to train a network with only 12 images. But your neural network will be limited in functionality. Note that in the stop sign tutorial, all signs are more-or-less the same size, taken from similar distances and angles. The network trained will be limited in finding stop signs which are similar to what was used to train.
Scenario #1:
In this first scenario, there is an extremely low amount of variability in what the camera will see. Images or video frames will be very similar to each other.
Because of the extremely repetitive images, you'll find you can train with very few images. Even with a high number of classes (such as what you might have when processing text forms) the network mAP% should very quickly rise to 100% during training.
The repetitive images means that max batches can stay low.
It is very important in these scenarios to have negative samples during training. So if the network needs to find a part moving on a conveyer belt, then make sure to include images the camera will see of the conveyer belt without the part you need it to find.
If working with text forms, then a negative sample might be to have some forms scanned upside down. This will also teach your network what forms to accept, and which ones to reject even if the form is nearly identical to what is is attempting to detect. During inference, you'd then know to rotate rejected images 180 degrees and try again.
To get started, annotate a dozen images and include an additional dozen negative sample images. (See also: What about negative samples? and How to annotate images?)
Depending on variability with ligthing conditions and how many ways the part can be rotated, you'll eventually work up to several hundred images to get a decent network trained.
These networks are typically fast to train.
Scenario #2:
In the second scenario, the scene might change in lighting, but the background is relatively fixed.
Like the previous scenario, negative samples will help the neural network determine what is the background that must be ignored.
You may need to collect images over the span of a year to eventually train the network the difference between summer, winter, and everything in between.
To get started you'll have a few dozen images, but know you likely need to scale to thousands.
And the more classes you want to detect, the more images you need. For example:
- Need to recognize a blue car? That is an image.
- A blue car in the lower right as well as the upper left? More images.
- Do you need to find red cars too? Duplicate all the previous images.
- Cars of any colour of the rainbow? Yet more images.
- Small cars as well as large cars?
- Two cars at once? Three cars at once? Four? Each combination requires more images.
- What about trucks? Pickup truck, transport trucks, garbage truck? More images of each type and colour.
- Buses? School buses? City buses? Commercial buses? Black buses? White buses? More images!
- Cars at noon? Cars when it is raining? Cars in winter when the road is white and covered in snow? At 9am or 9pm? With headlights on or with lights off?
Scenario #3:
The last scenario is the most complex. Expect to have to retrain often as you add annotated images.
You have all the possibilities of the previous scenario, but in addition you don't control who takes the images, the type of camera used, or how it is done. You have no idea what the background will be. You have no idea if the camera will be in focus, zoomed in, tilted slightly to one side, what the lighting conditions are, if the image is upside down, etc.
To get started you can begin with just a few dozen images, but because diversity is key to make this scenario work, your network will need thousands of annotated images per class.
See also: What about negative samples? and How to annotate images?
What about negative samples?
50% of your dataset should be negative samples. Negative samples are images where your objects do not appear.
For example, if you are detecting people walking in a park, then 50% of your images should be the park without people. This way the network learns the difference between what is important and what is the background to be ignored.
Note that the quality of the negative samples is important. Same example, if you are detecting people walking in a park but your negative samples is pictures of teacups and utensils, it doesn't help the network learn. Instead, your negative samples should be the same -- or similar -- park settings. In summer, winter, night, and day...the same kind of images you'd use to detect people walking in a park.
Also useful would be other things in the park that you don't want to confuse with people. So dogs in the park. Squirrels in the park. Birds in the park. Things which the network needs to learn might appear in your pictures, but are not objects to detect.
See also: How many images will it take? and How to annotate images?
Can I train a neural network using synthetic images?
No.
Or, to be more precise, you'll probably end up with a neural network that is great at detecting your synthetic images, but unable to detect much in real-world images.
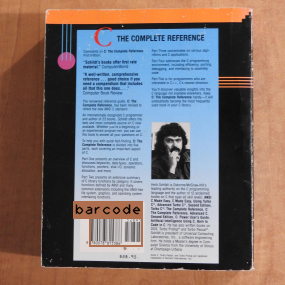
(Yes, one of my first Darknet tutorials was to detect barcodes in synthetic images, and that neural network worked great...but mostly at detecting barcodes in synthetic images!)
This video has additional information on why synthetic images typically don't work well with Darknet/YOLO:
See also: How to annotate images?
What does the error message "CUDA Error: out of memory" mean during training?
If training abruptly stops with one of these messages:
Or with:
Or with:
Or with:
(The actual text may differ since it depends on the version of CUDA+cuDNN installed.)
This means you don't have enough video memory on your GPU card. There are several possible solutions:
- choose a different configuration file that consumes less memory (see: which configuration file should I use?)
- decrease the network dimensions, meaning width=... and height=... in the [net] section of your .cfg file (see: what is the optimal network size?)
- increase the subdivisions, meaning subdivisions=... in the [net] section of your .cfg file
- purchase a different GPU with more memory
If the network dimensions cannot be modified (because you're already using the optimal size) the most common solution is to increase the subdivision. In the [net] section of your .cfg file you might see this:
Try doubling the subdivisions and train again:
Or:
Keep doubling the subdivisions until you don't get the out-of-memory error. Note the highter the subdivisions, the greater negative impact this will have on the training results. For best results, always keep subdivisions as close to 1 as possible.
If subdivision=... matches the value in batch=... and you still get an out-of-memory error, then you'll need to decrease the network dimensions (the width=... and height=... in [net]) or select a less demanding configuration.
See also: How much memory does it take?
What does the error message "signal handler invoked for signal #4" mean?
On some older computers, the compiler may incorrectly detect AVX & SSE and generate optimized code for an instruction set not supported by your CPU. When that happens, you'll get a message similar to this when you try to use Darknet:
If this happens, add the flag -DENABLE_SSE_AND_AVX=off to CMake during the build process. For example:
- cmake -DCMAKE_BUILD_TYPE=Release -DENABLE_SSE_AND_AVX=off ..
Once you re-build and re-install the Darknet package, the problem should disapear.
What does the error message "parameter packs not expanded with ‘...’" mean?
With older versions of the NVIDIA C/C++ compiler, you might see this error when building Darknet/YOLO:
You must upgrade to a newer version of the NVIDIA compiler if you get this error. Run nvcc --version to see which version you are running. Download and install a newer version of the CUDA tools to get full support for C++17.
What does the error message "unsupported gpu architecture" mean?
NVIDIA regularly decides to no longer support some of their older hardware. One such event resulting in support for older hardware being dropped happened between CUDA 12 and CUDA 13. If you install a new version of CUDA on a computer with an older GPU, you may get an error like this:
You must either downgrade to an older version of CUDA (not always possible), build Darknet/YOLO without GPU support, or upgrade your hardware.
How to build Darknet on Linux?
The Linux instructions for building Darknet are very simple. It should not take more than 2 or 3 minutes to get all the dependencies installed and everything built.
Taken from the Darknet/YOLO repo page, it should look similar to this when building Darknet on a Debian-based distribution such as Ubuntu:
This YouTube video shows how to install Darknet and associated tools:
If you want to use your NVIDIA GPU -- especially if you plan on training -- see the relevant information in the Darknet/YOLO repo readme.
You can download and install CUDA from here: https://developer.nvidia.com/cuda-downloads.
You can download and install CUDNN from here: https://developer.nvidia.com/rdp/cudnn-download.
See also: What about OpenCV and CUDA?
How to build Darknet on Windows?
The Windows builds are slightly more complicated than the Linux ones, but the process is very similar.
The full details are available on the Darknet/YOLO repo page. It is recommended you follow the steps outlined there.
In summary, run the following in a command prompt window (not Powershell!):
Add C++ to Visual Studio like this:
- click on the "Windows Start" menu and run "Visual Studio Installer"
- click on Modify
- select Desktop Development With C++
- click on Modify in the bottom-right corner, and then click on Yes
Once this is done, install OpenCV on Windows. Open a Developer Command Prompt for VS 2022 window (not Powershell!) and run the following commands:
Building OpenCV and dependencies will take some time. Once everything is built, run the following commands:
Additional details -- including installation instructions for CUDA and CUDNN -- are available in the Darknet/YOLO repo readme. Remember that on Windows, CUDA and CUDNN must be installed after Visual Studio. If you upgrade or update your installation of Visual Studio, you also must remember to re-install CUDA and CUDNN.
What about OpenCV and CUDA?
You definitely should NOT build OpenCV by hand! Yes, we know about the many tutorials. But it is difficult to do it correctly, and very easy to get it wrong. OpenCV is a complex library, with many optional modules. Some of those modules are not optional for Darknet, and many OpenCV tutorials don't include them.
Instead, please follow the standard way to install OpenCV for your operating system. On Debian-based Linux distributions, it is a single command that should look similar to this:
On Windows, use Microsoft's vcpkg to install OpenCV correctly:
Note there are other modules which may be necessary.
That's it! It really should never be more complicated than that. On Linux it shouldn't take more than a few seconds, while on Windows it will take some time to build.
Which brings up the topic of CUDA-enabled OpenCV. Please take note: Darknet DOES NOT use the CUDA portion of OpenCV! Don't bother spending hours (days?) trying to install it, Darknet wont use it. At all!
Darknet does use CUDA to train and run the neural network, but it does so directly, not via OpenCV. OpenCV is used to load images from disk, resize images, and data augmentation such as the "mosaic" images, all of which is done without the GPU.
To use CUDA and the GPU from within OpenCV, you'd need to make extensive modifications to the Darknet source code. For example, to use cv::cuda::GpuMat instead of the usual cv::Mat. And even then, it isn't as simple as people think, as described in this blog post on CUDA and OpenCV.
So save yourself the headache, install the "normal" OpenCV libraries, and don't waste any more time on trying to figure out how to enable CUDA within OpenCV.
Advanced topic (aka "can of worms"):
If you are using OpenCV's DNN module + CUDA to do your inference instead of Darknet, then obviously you need CUDA support when building OpenCV. This is an advanced topic, and isn't how most people starting out with Darknet/YOLO run their neural networks.
But this only applies to advanced users once they have everything already running.
See also: How many FPS should I expect to get?
How many FPS should I expect to get? How can I increase my FPS?
This depends on several things:
- Probably the biggest impact on FPS is the configuration you use. See What configuration file should I use? at the top of this FAQ.
- The network dimensions. The larger the dimensions, the slower it will be. See Does the network have to be perfectly square? and What is the optimal network size? at the top of this FAQ.
- Whether your video frames or images need to be resized due to the network dimensions you are using. Resizing video frames is very expensive.
- The hardware you use. Don't attempt to use the CPU. Get a GPU that has CUDA support.
Whether you are using Darknet+CUDA, or OpenCV DNN+CUDA.Since the release of Darknet V3 "Jazz" in October 2024, this is no longer an issue. The performance enhancements in V3 "Jazz" have made it so there isn't as much of a gap -- if any? -- between OpenCV's DNN and Darknet.- Prefer the C or C++ API over using Python. ("Statistically, C++ is 400 times faster than Python [...]")
Please see this blog post with details on running Darknet/YOLO/OpenCV on several popular IoT devices, like the Raspberry Pi, Jetson Nano, Jetson NX, etc.
How much memory does it take to train a custom network?
There are several factors that determine how much video memory is needed on your GPU to train a network. Except for the first (the configuration file itself), these are all defined in the [net] section at the top of the configuration file:
- the configuration file (YOLOv3, YOLOv3-tiny, YOLOv4, etc)
- the width of the network: width=...
- the height of the network: height=...
- the batch size: batch=...
- the batch subdivision size: subdivision=...
Typically, once a network configuration and dimensions are chosen, the value that gets modified to make the network fit in the available memory is the batch subdivision.
You'll want the subdivision to be as small as possible without causing an out-of-memory error. Here are some values showing the amount of GPU memory required using various configurations and subdivisions:
- network dimensions: 416x416
- batch: 64
| subdivisions= | 64 | 32 | 16 | 8 | 4 | 2 | 1 |
|---|---|---|---|---|---|---|---|
| YOLOv3 | 3085 MiB | 4406 MiB | 6746 MiB | ? | ? | ? | ? |
| YOLOv3-tiny | 1190 MiB | 1204 MiB | 1652 MiB | 2522 MiB | 4288 MiB | ? | ? |
| YOLOv3-tiny-3l | 1046 MiB | 1284 MiB | 1814 MiB | 2810 MiB | 4846 MiB | ? | ? |
| YOLOv4 | 4236 MiB | 6246 MiB | ? | ? | ? | ? | ? |
| YOLOv4-tiny | 814 MiB | 956 MiB | 1321 MiB | 1752 MiB | 2770 MiB | 5532 MiB | ? |
| YOLOv4-tiny-3l | 830 MiB | 1085 MiB | 1282 MiB | 1862 MiB | 2982 MiB | 5748 MiB | ? |
Here is the same table but for a slightly larger network size:
- network dimensions: 608x608
- batch: 64
| subdivisions= | 64 | 32 | 16 | 8 | 4 | 2 | 1 |
|---|---|---|---|---|---|---|---|
| YOLOv3 | 4648 MiB | 4745 MiB | ? | ? | ? | ? | ? |
| YOLOv3-tiny | 1278 MiB | 1774 MiB | 2728 MiB | 4634 MiB | ? | ? | ? |
| YOLOv3-tiny-3l | 1473 MiB | 2059 MiB | 3044 MiB | 5420 MiB | ? | ? | ? |
| YOLOv4 | 6906 MiB | ? | ? | ? | ? | ? | ? |
| YOLOv4-tiny | 984 MiB | 1262 MiB | 1909 MiB | 2902 MiB | 5076 MiB | ? | ? |
| YOLOv4-tiny-3l | 1020 MiB | 1332 MiB | 1938 MiB | 3134 MiB | 5518 MiB | ? | ? |
Memory values as reported by nvidia-smi. My setup is a GeForce RTX 2070 with only 8 GiB of memory, which limits the configurations I can run.
How long does it take to train a custom network?
The length of time it takes to train a network depends on the input image data, the network configuration, the available hardware, how Darknet was compiled, even the format of the images at extremes.
Some tldr notes:
- Resize your training and validation images to match the network size.
- For example: mogrify -verbose -strip -resize 416x416! -quality 75 *.JPG
- Build Darknet with support for OpenCV: loading images is slower without OpenCV.
- Build Darknet with support for OpenCV: resizing images is slower without OpenCV.
- Build Darknet with support for CUDA/CUDNN. (This requires supported hardware.)
- Use the tiny variants of the network.
The format of the images -- JPG or PNG -- has no meaningful impact on the length of time it takes to train unless the images are excessively large. When very large photo-realistic image files are saved as PNG, the excessive file sizes means loading the images from disk is slow, which significantly impacts the training time. This should never be an issue when the image sizes match the network sizes.
The table shows the length of time it takes to train a neural network:
- YOLOv4-tiny
- network dimensions=416x416
- batch=64, subdivisions=2
| original 4608x3456 JPG images | 4608x3456 JPG images, quality=75 | 800x600 JPG images, quality=75 | 416x416 JPG images, quality=75 | |
|---|---|---|---|---|
| Darknet compiled to use GPU + OpenCV | 10 iterations: 42.26 seconds 10K iterations: 11h 44m |
10 iterations: 35.27 seconds 10K iterations: 9h 47m |
10 iterations: 6.90 seconds 10K iterations: 1h 55m |
10 iterations: 6.76 seconds 10K iterations: 1h 53m |
| Darknet compiled to use GPU + OpenCV, but using PNG images instead of JPG |
n/a | 10 iterations: 80.70 seconds 10K iterations: 22h 25m |
10 iterations: 6.93 seconds 10K iterations: 1h 56m |
10 iterations: 6.71 seconds 10K iterations: 1h 52m |
| Darknet compiled to use GPU, but without OpenCV | 10 iterations: 113.31 seconds 10K iterations: 31h 29m |
10 iterations: 106.56 seconds 10K iterations: 29h 36m |
10 iterations: 9.19 seconds 10K iterations: 2h 33m |
10 iterations: 7.70 seconds 10K iterations: 2h 8m |
| Darknet compiled for CPU + OpenCV (no GPU) | 10 iterations: 532.86 seconds 10K iterations: > 6 days |
10 iterations: 527.41 seconds 10K iterations: > 6 days |
10 iterations: 496.47 seconds 10K iterations: > 5 days |
10 iterations: 496.03 seconds 10K iterations: > 5 days |
For these tests, GPU was a GeForce RTX 2070 with 8 GiB of memory, CPU was a 8-core 3.40 GHz.
Note that all the neural networks trained in the previous table are exactly the same. The training images are identical, the validation images are the same, and the resulting neural networks are virtually identical. But the length of time it takes to train varies between ~2 hours and 6+ days.
See also: What is the optimal network size.
What command should I use when training my own network?
I store all my neural network projects in subfolders within /home/username/nn/ (where "nn" means "neural networks"). So if I was to start a project called "animals", all my images and configuration files would be stored in ~/nn/animals/.
This is the command I would run to train my "animals" neural network from within Linux:
Note how I don't use any starting weights files. When I train my own neural networks, I always start with a clean slate.
I like to capture all the output generated by darknet (STDERR and STDOUT) so modify the previous command like this:
On Windows, if you don't have a tool similar to tee, then the command might look like this:
Darknet does not need to run from within the darknet subdirectory. It is a self-contained application. You can run it from anywhere as long as it is on the path, or you specify it by name.
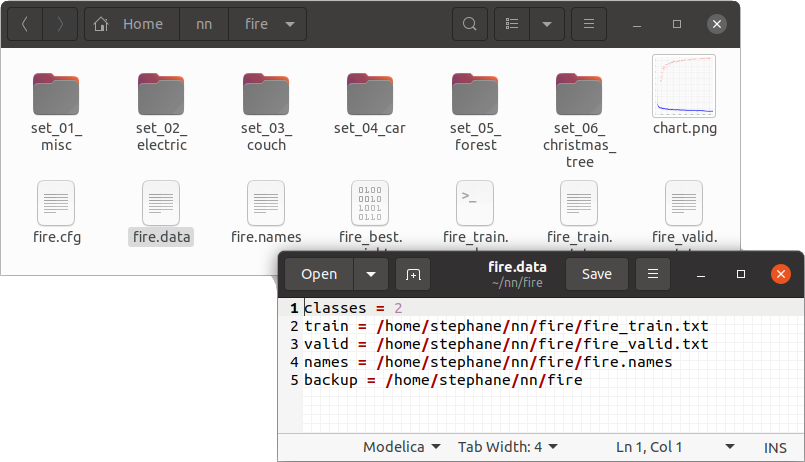
The various filenames (data, cfg, images, ...) can be relative to the current directory, but I prefer to use absolute filenames in all the darknet configuration files to remove any ambiguity. For example, given the previous "animals" project, the content of the animals.data file might look like this:
Once training has started, open the image file chart.png in your favourite image viewer to see the progress. Darknet regularly updates chart.png during training.
If you want to re-train your network using previous weights, you'll need to add the -clear flag, as well as the name of the existing weights to use. So to continue with the "animals" example, that would look like this:
Important flags to know about when training:
- -map Should always be used when training. It tells Darknet to calculate the "mean average precision" periodically during training to decide if training is progressing correctly.
- -dont_show Determines if Darknet will attempt to show the chart.png image on the GUI, or if it should skip opening a GUI window. On Linux servers that don't run a GUI (such as "colab") this is required, otherwise Darknet will abort.
- -clear This resets the "image seen" counter in the .weights file back to zero, and is required if you would like to re-train with weights that have already reached the maximum batch size.
How should I setup my files and directories?
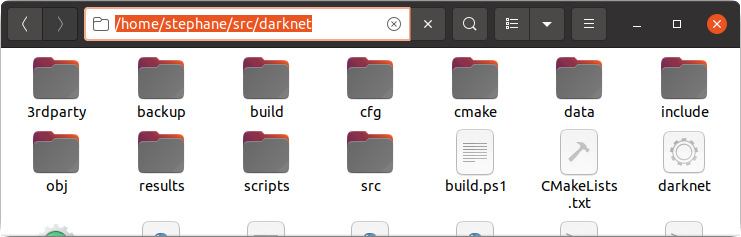
The Darknet repo is cloned into the ~/src/ subdirectory. Don't put any other personal or modified files into that subdirectory to maintain a clean source directory. This way it will be very simple to "git pull" every once in a while to grab the most recent Darknet changes.
The directory should look like this:
All of the trained neural networks are stored in a completely different subdirectory called "nn". Each project is a different subdirectory from within "nn".
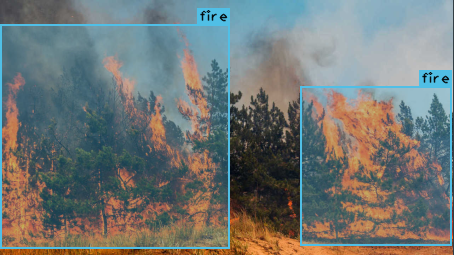
For example, in this image I have 4 custom neural network projects:

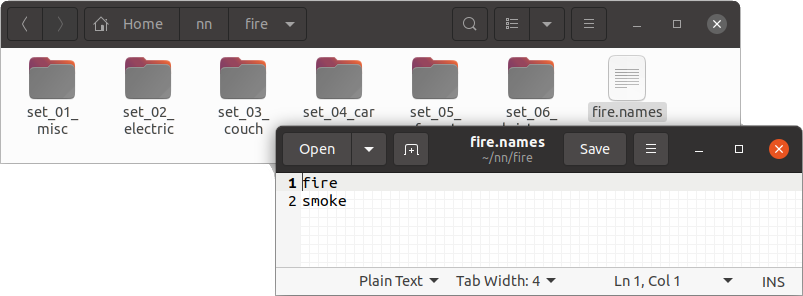
Let's use the "fire" project as an example.
Within the /home/stephane/nn/fire/ subdirectory, I create one or more image dataset directory, and I also create the .names file.
My "fire" project then looks like this:
Lastly, the rest of the darknet configuration files are also written out to this project directory. (Not the Darknet source code directory!) This includes the .cfg, the .data, and the various other files created by darknet and DarkMark.
Note how I use absolute paths in the .data and various .txt files to remove any ambiguity as to where the files reside.
Once everything is setup this way, I call darknet directly to begin training, and I continue using absolute path names. For example:
On Windows the instructions above remain more-or-less the same but replace all instances of /home/stephane/nn/fire/ with C:/Users/stephane/Desktop/nn/fire/.
What about the "train" and "valid" files?
Contrary to what most people would initially guess, the valid=... line in the .data file is not used for training the neural network! The file is only used to draw the results in chart.png. So especially if you have very few images in your dataset, go ahead and use 100% of the the annotated images for training, and the same 100% for validation.
The conversation with AlexeyAB on this topic was as follows:
The answer from AlexeyAB was:
How to run against multiple images, and/or how to get JSON output?
The preferred way would be to use the API. This way you load the network once, run it against as many images you need, and process the results exactly the way you want.
Darknet has a C API, C++ bindings, and there are other open-source libraries such as DarkHelp which provide an alternate C++ API.
If you are looking for something you can run from the CLI without writing any C or C++:
To use the darknet command line instead of the API, run "darknet --help" or see Using Darknet in the readme.
Similarly, DarkHelp also has a JSON/CLI mode which may be used to process many images at once.
Should I crop my training images?
No!
Say you want a network trained to find barcodes. If you crop and label your training images like this:
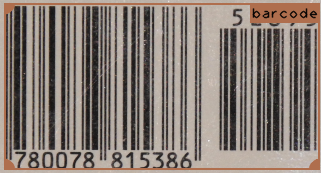
...then your network will only learn to recognize barcodes when they take up 100% of the image. It is unlikely you want that; if the objects to find always took up 100% of the image, then there is little use to train a neural network.
Instead, make sure your training images are representative of the final images. Using this barcode as an example, a more likely marked up training image would be similar to this:
See also: Darknet & DarkMark image markup.
How to annotate images?
TLDR summary:
- Every object within an image must be annotated. If you are annotating cars, and you have an image where you annotated 1/2 the cars and left the other 1/2 without annotations, your network will not train correctly.
- Annotate exactly as you'd like Darknet to return the results. The annotations are literally how Darknet learns what you want to see in the results! And it learns purely by example.
- If you want Darknet to find an object in a particular scenario, under certain lighting conditions, at a particular angle, and of a certain size, then you must have training images that covers that exact scenario. Similar zoom, similar light, similar colour, similar orientation, etc. (See How many images will it take?)
- Do not dismiss negative samples!
Example video that shows how to use DarkMark to annotate images for use with Darknet/YOLO:
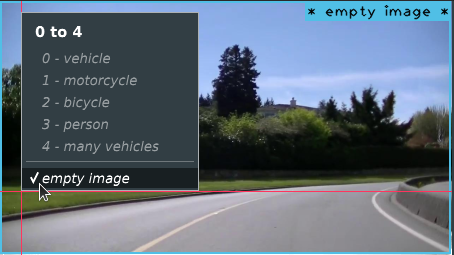
Images that don't contain any of the objects you want to find are called negative samples, and they are important to have in your training set. When marking up your images, the negative samples will have a blank (empty) .txt file, telling Darknet that nothing of interest exists in that image.
In DarkMark, this is done by selecting the "empty image" annotation.
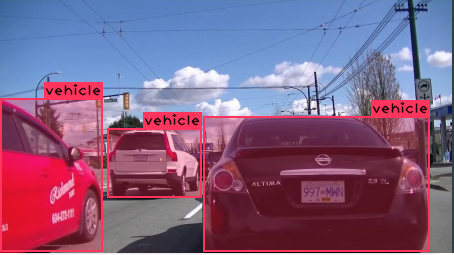
Meanwhile, the rest of your images should have 1 annotation per object. If an image contains 3 vehicles, and "vehicle" is one of your classes, then you must markup the image 3 times, once for each vehicle. Don't use a single large annotation that covers all 3 vehicles, unless that is what you want the network to learn. And similarly, don't break up your object into multiple smaller parts to try and get better or tighter coverage. You should stick to the rule "1 object = 1 annotation".
This becomes much more challenging when trying to detect things like clouds, smoke, fire, or rain: the goal is not to cover the image with many small annotations to achieve 100% pixel coverage. Instead, you want to identify each distinct object you'd like the neural network to identify.
Image annotated incorrectly:
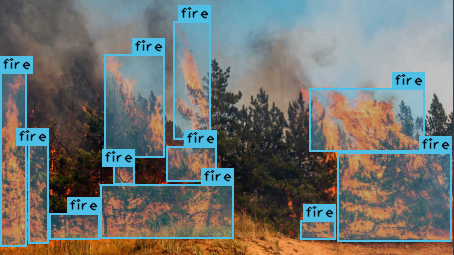
Same image annotated correctly:
Additional markup comments and techniques are discussed on DarkMark's "markup" page.
See also: How many images?
How do Darknet/YOLO annotations work?
Darknet/YOLO annotations are saved to text files, one per image. Each line is a bounding box within the image. The annotation coordinates are normalized, and look like this:
The five fields are:
- the zero-based class index
- the center X coordinate
- the center Y coordinate
- the width
- the height
Here is an example to demonstrate. Say we want to annotate the "5" mailbox digit in this image:
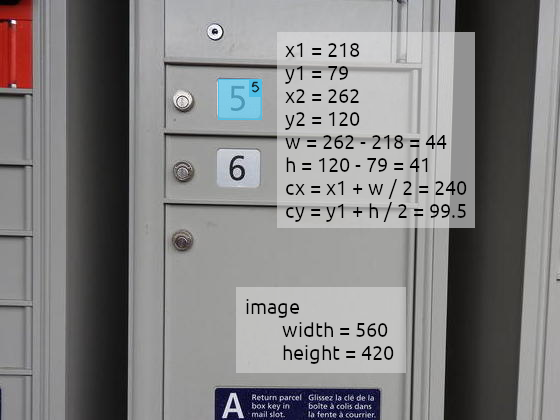
Knowing the center of the "5" is located at coordinate (240, 99.5) and the image dimensions are 560x420, the values are normalized like this:
- center X = 240 / 560 = 0.428571429
- center Y = 99.5 / 420 = 0.236904762
- width = 44 / 560 = 0.078571429
- height = 41 / 420 = 0.097619048
The classes for this neural network are the digits from "0" to "9", so the first value at the start of the line would be "5". The annotation in the .txt file would look like this:
How do I turn off data augmentation?
If you are using DarkMark, then set to zero or turn off all data augmentation options.
If you are editing your configuration file by hand, verify these settings in the [net] section:
How important is image rotation as a data augmentation technique?
Depends on the type of image. Some things don't make much sense rotated (e.g., dashcam or highway cam images). But the impact of rotated images needs to be considered. For example, here is a network that is really good at detecting animals:
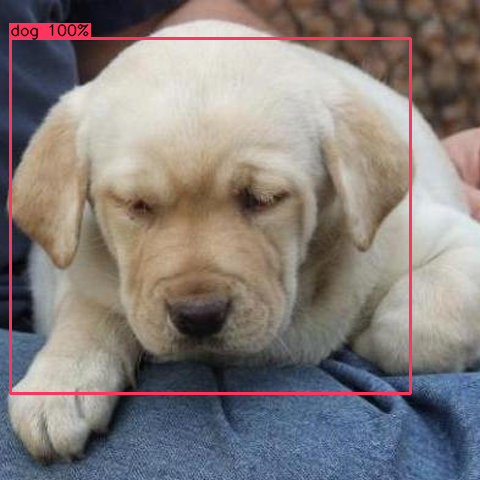
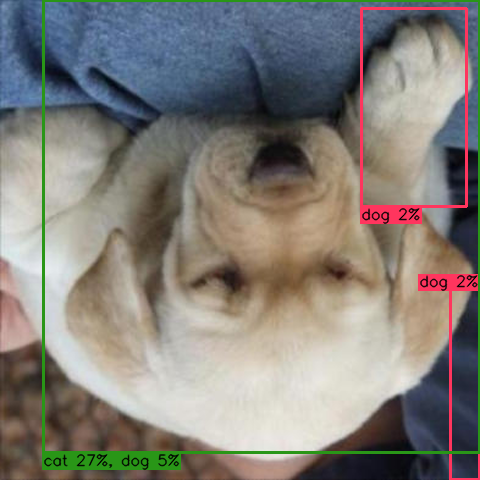
With 100% certainty, that is a very cute dog. But when the exact same image is rotated 180 degrees, all of a sudden the neural network thinks this is more likely to be a cat than a dog.
See also: Data Augmentation - Rotation
Merch
Help support the development and maintenance of Darknet/YOLO, DarkHelp, and DarkMark with the purchase of items from the store.
Where can I get more help?
Come see us on the Darknet/YOLO Discord!
TLDR (troubleshooting list)
- Do you have the right repo cloned? You should not be using the original one by Joseph Redmon nor the fork by AlexeyAB as both of those were abandoned several years ago. Instead, please see the popular fork maintained by Stéphane Charette.
- Running into problems building the source code? Building on Linux should be easy. Building on Windows is more complicated.
- If training abruptly quits:
- Have you checked your paths? Both in the .data file, as well as in the train.txt file? Make sure the images listed are correct.
(At the same time, may as well verify the .txt annotations are in the same directory as the images.) - What command are you running to train? It should look like this.
- Are you running on a headless server? Remember to use -dont_show so Darknet knows to skip opening a GUI window. See the previous question.
- Are you running out of memory? Do you see CUDA Error: out of memory in the output?
- Curious to see how much vram it will take to train a network?
- Have you checked your paths? Both in the .data file, as well as in the train.txt file? Make sure the images listed are correct.
- If the results aren't great:
- Are you training for long enough? You should be training for a minimum of 6000 iterations. If you have more than 1 class, then you should be training for a minimum of "2000 * number of classes". So a project with 10 classes will need to train for at least 20,000 iterations. If you have a large number of images, the minimum iterations may be higher.
- How many images are you using? If the answer is less than a thousand images per class, then you better know what you are doing.
- How many negative samples did you include in your images? If it is significantly lower than half your images, then you need to explain why.
- Are you attempting to train using a CPU?
- Having trouble finding small objects? Do you understand how network dimensions, image size, and object size matters?
- Do you have very large images, or is the aspect ratio causing problems? In addition to the above question related to network/image/object dimensions, you may also want to consider image tiling, which is available with both DarkHelp and DarkMark.
- If everything listed above checks out, but the results are not great, the next step is to verify your annotations. I recommend DarkMark, a free open-source tool to manage Darknet neural network projects, annotate images, verify annotations, and create the necessary Darknet config files.
- Darknet CLI usage:
- The README.md has examples of the various commands you can run.
- Note you can run Darknet against a list of images and get the results in bulk.
- Other:
- Please see the full FAQ.
